
Set Up Your AI Agent
Before you start, make sure you've completed Sign Up and created your first AI Agent. If not, start with the Introduction and Sign Up guides first.
This guide walks you through connecting knowledge, testing the agent, deploying it to a channel, and configuring escalation. By the end, your AI Agent will be handling real conversations and routing what it can't resolve to your team.
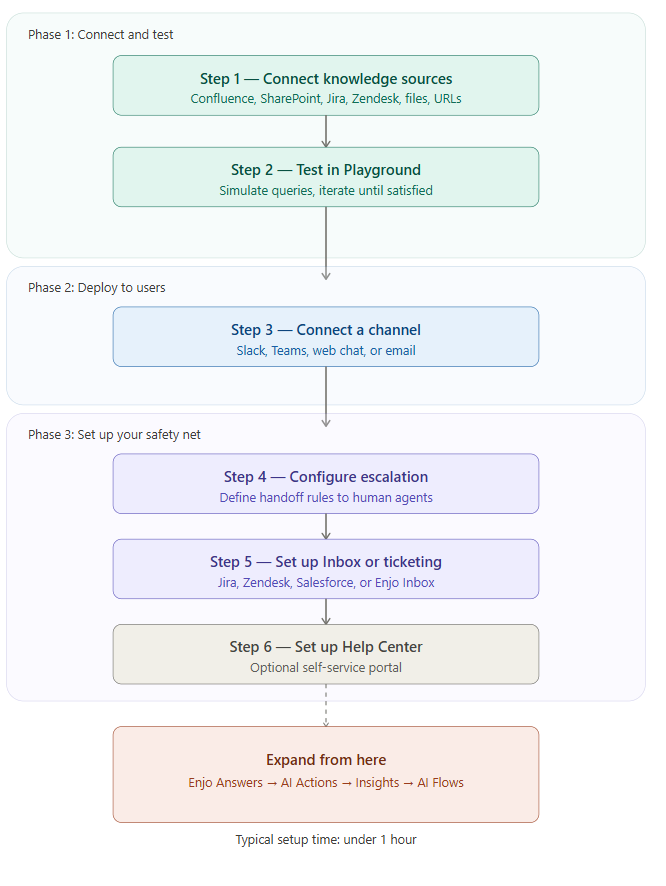
Phase 1: Connect and Test
An AI Agent is only as good as the knowledge behind it. These steps give it what it needs to answer accurately.
Step 1 — Connect Your Knowledge Sources
Your AI Agent only knows what you connect and approve. Add the sources it will use to answer questions: documentation from apps like Confluence, SharePoint, or Google Drive, past tickets from Jira or Zendesk, uploaded files, or website URLs.
This is the single most impactful setup step. The quality of the agent's responses depends directly on the knowledge you provide.
Tip: Start with one or two high-quality sources rather than connecting everything at once. You can always add more later.
Step 2 — Test in Playground
Use Playground to simulate real user queries and see exactly how the agent responds before anyone else does. Test a range of questions: ones you expect the agent to answer, ones it should escalate, and edge cases.
If a response is off, adjust your knowledge sources or agent configuration and test again. Iterate until you're satisfied — this is your safe space to get things right.
Phase 2: Deploy to Users
Once you're confident in how the agent responds, connect it to the channels where your users already work.
Step 3 — Connect a Channel
Connect the agent to a channel so users can interact with it. Full AI resolution is supported on Slack, Microsoft Teams, and web chat (Enjo widget). Email routes inbound messages to Inbox for human agent handling.
You can connect multiple channels and assign each to one or more agents. Start with one channel, see how it performs, and expand from there.
Phase 3: Set Up Your Safety Net
Your agent will handle most requests on its own. For the ones it can't resolve, you need a clear path to your team with full context preserved.
Step 4 — Configure Escalation
Define the rules for when the AI Agent should hand a request off to a human. You control the conditions that trigger a handoff, where the request goes (Inbox or a connected ticketing system), and what context is passed along.
Without escalation rules, the agent has no fallback when it can't resolve a request on its own.
Step 5 — Set Up Inbox or Connect Your Ticketing System
Choose where your team will handle escalated requests:
Inbox is Enjo's built-in workspace for human agents. Conversations arrive with the full chat history, a summary of what the AI Agent did, and any linked ticket context. → Set up Inbox
External ticketing system — If your team already uses Jira, Zendesk, Salesforce, ServiceNow, or Freshservice, you can route escalations directly there instead. The agent creates and updates tickets automatically so your team stays in their existing tool. → Connect your ticketing system
You can use Inbox, a ticketing system, or both.
Step 6 — Set Up Your Help Center (optional)
If you want to give users a way to find answers on their own before reaching out to the AI Agent, set up a Help Center. It's a standalone, user-facing portal where employees or customers can browse support articles and get AI-powered search results. The Help Center shares the same knowledge layer as your AI Agent, so content stays consistent.
You can skip this step and set it up later.
Expand From Here
Your agent is deployed, tested, and backed by a safety net. Here's what to explore next, in recommended order:
Agent Assist — If your team handles escalations in Jira Service Management, Zendesk, Salesforce, or ServiceNow, set up Agent Assist to surface AI summaries, reply suggestions, and knowledge inside the tools your agents already use.
→ Set up Agent AssistEnjo Answers — Use this to manage the knowledge that grounds your AI Agent's responses, prioritizing high-confidence answers for your most common requests.
→ Manage Enjo AnswersAI Actions — Set these up next to let the agent retrieve data or take actions in external systems during conversations, such as looking up an account in Salesforce or unlocking a user in Okta. → Configure AI Actions
Insights — Once the agent has been live for a few days, use Insights to monitor AI resolution rates, ticket analytics, team performance, and cost savings. → Explore Insights
AI Flows — Build these when you encounter requests that require multiple steps, conditional logic, or fallback rules to resolve. → Build an AI Flow
Need Help?
If you run into any issues during setup, reach out to our support team or visit the Enjo Help Center for troubleshooting guides and FAQs.