Getting Started with Help Center
In this article, you'll learn what Enjo Help Center is, understand the key concepts, and complete a quick start walkthrough from creating your Help Center to publishing your first AI-generated article.
What is Enjo Help Center
Enjo Help Center is a branded self-serve portal where your customers can find answers, browse articles, and get instant AI-powered responses without contacting your support team.
At the core of Help Center is the Help Center Agent an AI content assistant that creates and updates articles for you. It uses your website, connected knowledge sources, and resolved support interactions as source material, so your content stays accurate and grounded.
Every support interaction feeds back into the Help Center, creating a self-improving loop:
Customers ask questions in the AI Assistant
Unanswered or escalated questions surface as content gaps
The Help Center Agent suggests new articles to fill those gaps
You review, edit, and publish the suggested articles
The AI Assistant learns from the new content and answers more questions over time
Key concepts
Concept | What it is |
|---|---|
Article | A single piece of help content a guide, troubleshooting doc, or FAQ. Articles can be in Draft or Published state. |
Collection | A group of related articles that form the structure of your Help Center — for example, "Getting Started" or "Billing". |
Help Center Agent | The AI content assistant that creates and updates articles. It uses templates, free-form prompts, and your connected knowledge sources to generate grounded content. |
AI Assistant | The AI-powered search widget embedded in your Help Center portal. Customers ask questions in natural language and get instant answers from your published content. |
Draft | An article that is saved but not visible to customers. |
Published | An article that is live and visible in the portal. |
Where are you starting from?
New to Enjo? If you are signing up for Enjo for the first time, your AI Agent and Help Center are set up automatically during onboarding. Follow the steps in New to Enjo — Onboarding flow.
Already using Enjo? If you have an existing Enjo workspace with AI Agents already configured, jump to Adding Help Center to your existing workspace.
New to Enjo — Onboarding flow
When you sign up for Enjo, the onboarding flow automatically sets up your AI Agent and Help Center. You do not need to create either manually.
Step 1 — Sign up
Enter your organization work email and click Sign up.
Verify your email with the code sent to your inbox.
Enjo detects your company profile automatically from your work email domain.
Step 2 — Enjo analyzes your website
Enjo crawls your website to understand your business, product, and offerings. It uses this information to customize your AI Agent's personality, tone, and knowledge before you make any configuration decisions.
Step 3 — Choose your AI Agent type
Select the type of AI Agent you want to set up first:
Customer AI Agent — helps your customers with product questions and self-service support
Click Continue.
💡 If you selected Help Center as your first deployment, Enjo automatically sets up a Customer AI Agent. The Internal AI Agent option is available for teams deploying Enjo for IT or HR support — it does not include a Help Center.
Step 4 — Review your auto-configured agent
Enjo auto-populates your agent configuration based on your website and company profile. Review the following:
Workspace name — auto-filled from your organization
Agent name — auto-generated based on your company
Conversation tone — set based on your website content
Offering overview — a summary of what your organization does
Intended audience — who the agent is built for
Edit any fields if needed, then click Continue.
💡 You do not need to change anything here if the details look correct. You can always update the agent configuration later from AI Agent Settings.
Step 5 — Select Help Center as your first deployment
Choose what you want to deploy first:
Help Center — A customer-facing knowledge base with instant article search and self-service troubleshooting.
AI Agent + Inbox — Autonomous AI chat for handling queries and a unified inbox for your human support team.
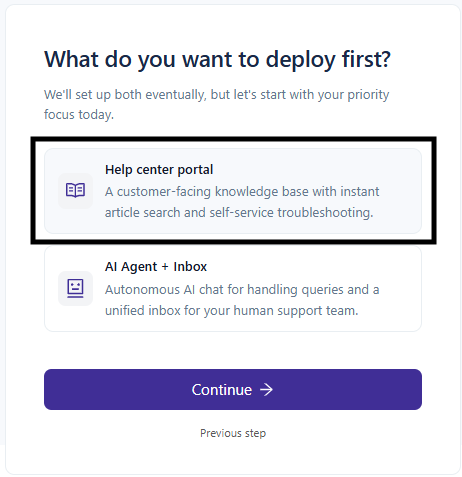
Select Help Center and click Continue.
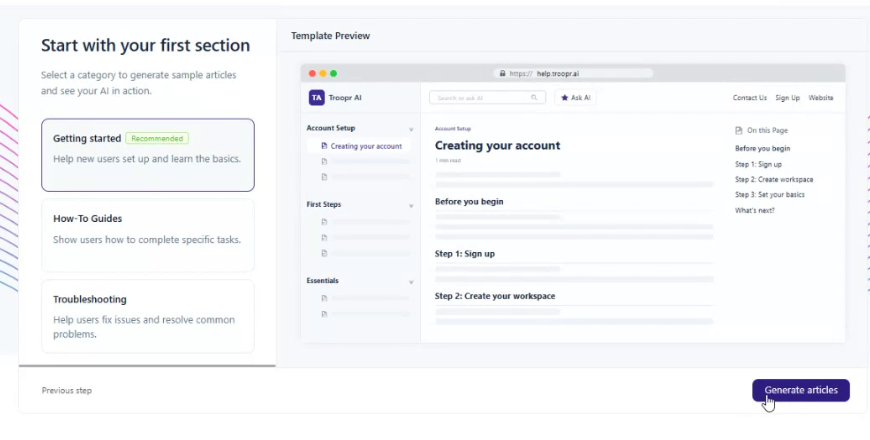
Step 6 — Select your first article category
You will see a full overview of what your Help Center will look like. Choose a category for the first set of articles to generate:
Getting started (Recommended) — helps new users set up and learn the basics
How-To Guides — shows users how to complete specific tasks
Troubleshooting — helps users fix issues and resolve common problems
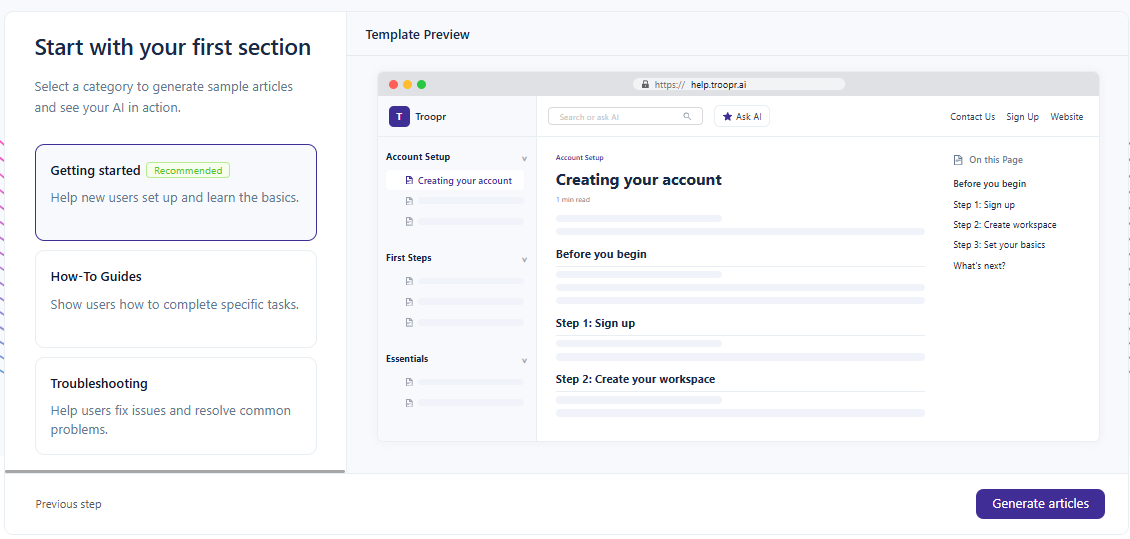
Select a category and click Generate articles.
💡 Start with Getting started — it is the most impactful first section for new users and sets the foundation for the rest of your content structure.
Step 7 — Invite team members (optional)
You can invite teammates to collaborate in your workspace at this point:
Enter their name and email address.
Add up to five members by separating emails with commas.
Assign each member a role — Admin, Agent, or Owner.
Click Invite and continue.
If you want to skip this step, click Skip for now.
💡 You can invite team members at any time later from Settings > Users.
Step 8 — Your first article is being generated
You are now in the Help Center. Your first article is generating automatically.
The Help Center Agent:
Fetches your website and discovers related URLs
Researches and gathers grounded source material
Drafts the article based on the evidence
Verifies the draft against the source material through multiple checks
Within a few minutes your first article is ready to review.
Continue with Reviewing and publishing your article section below.
Adding Help Center to your existing workspace
Follow these steps if you already have an Enjo workspace with AI Agents configured.
Step 1 — Confirm your AI Agent is ready
Before creating the Help Center, confirm the agent you want to use:
Has a clear Persona configured — name, tone, and role
Has relevant Knowledge Sources connected — especially your website or product documentation
Is working correctly in your other channels
💡 You can create a dedicated AI Agent specifically for your Help Center if you want to keep its knowledge and behavior separate from your internal support agents.
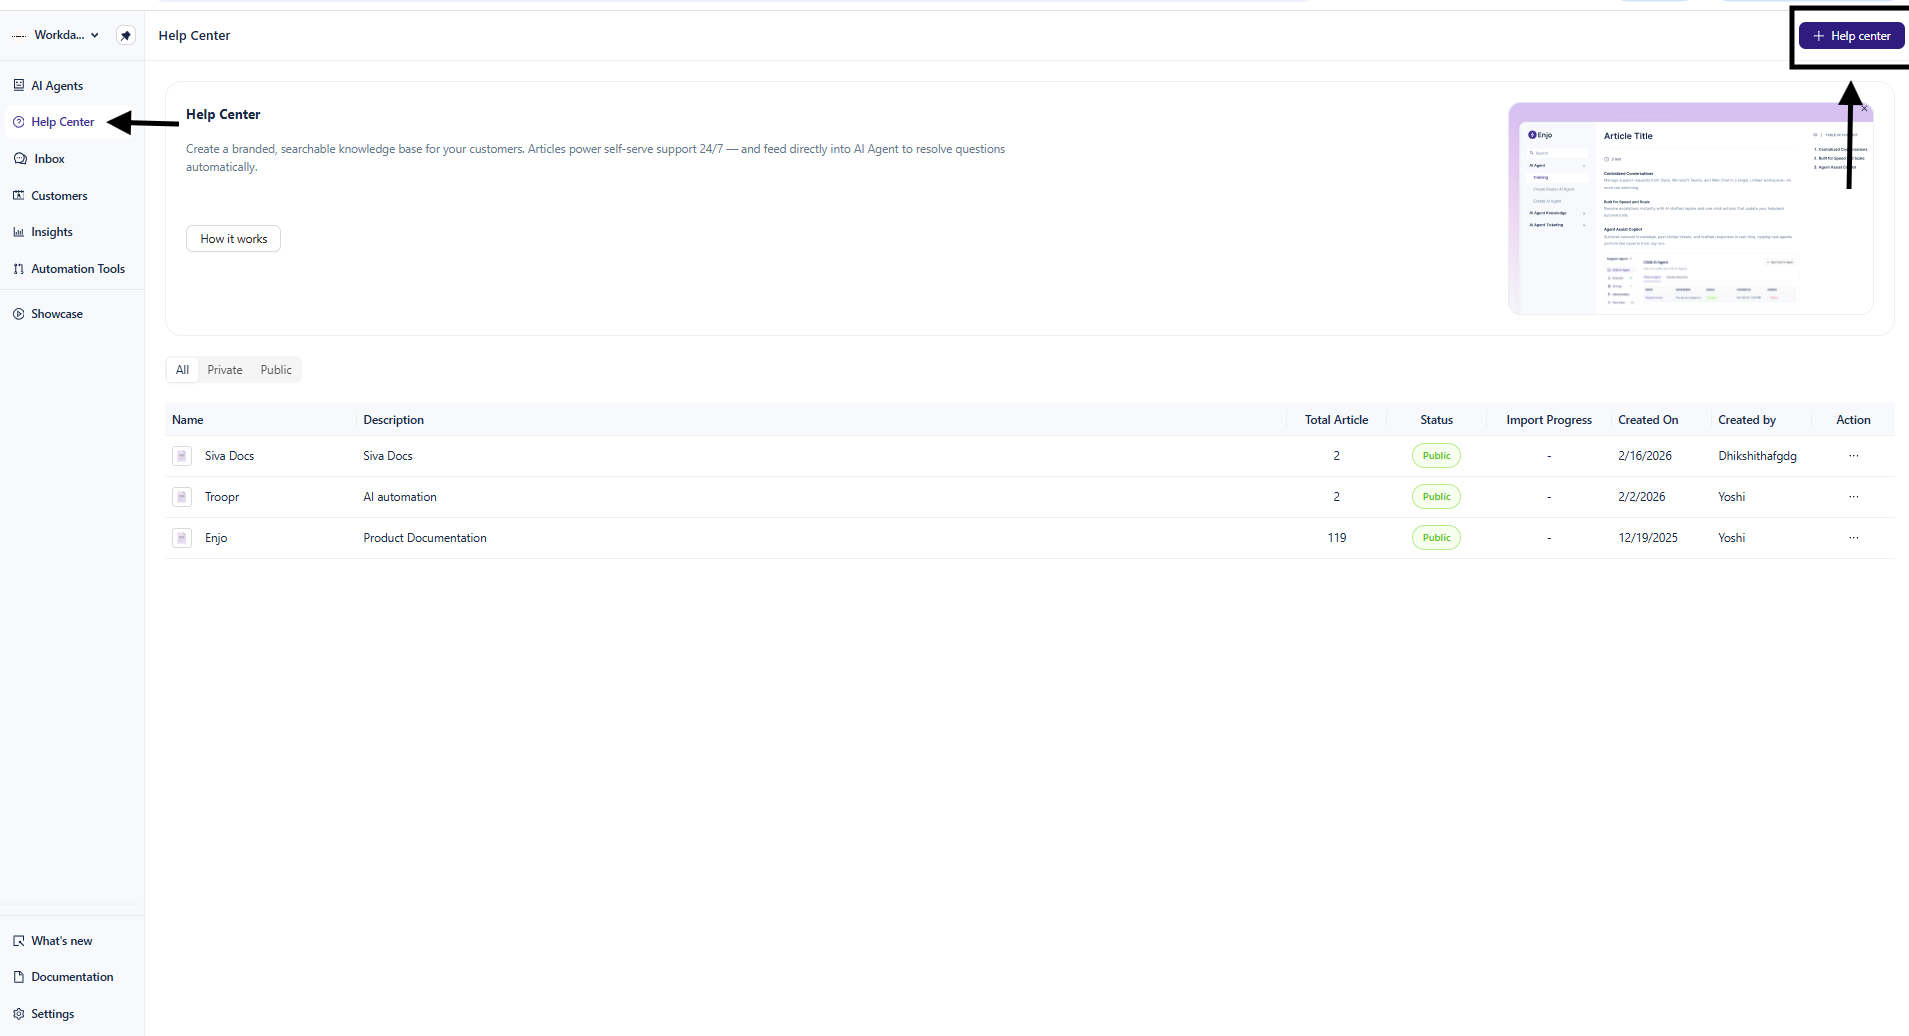
Step 2 — Create your Help Center
Go to Help Center from the left navigation.
Click + next to your existing Help Centers, or click Create New Help Center.
Select the AI Agent to power this Help Center from the dropdown.
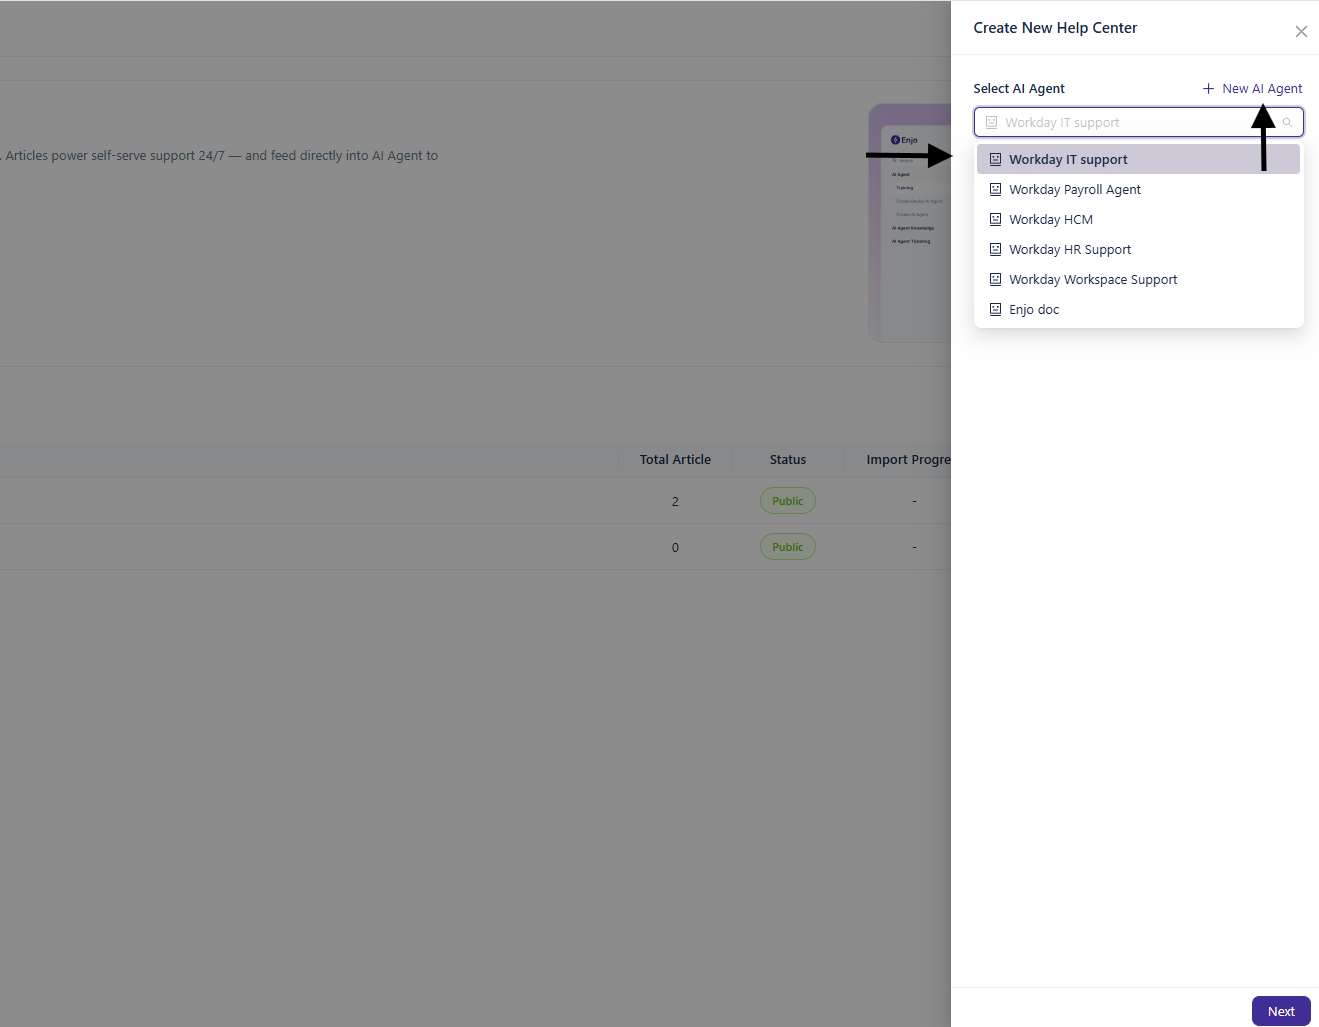
Click Next.
On the Add Details screen, fill in:
Help Center Name — enter a name for your Help Center
Conversation Tone — select the tone the AI Assistant will use
Offering Overview — a brief description of what your product or service does
Who it's for — describe the intended audience
Click Done.
Step 3 — Generate your first set of articles
After your Help Center is created, a Start with your first section modal opens automatically.
Select a category:
Getting started (Recommended)
How-To Guides
Troubleshooting
Preview the result using the live preview on the right.
Click Generate articles.
Continue with the steps below.
Reviewing and publishing your article
The following steps apply whether you are new to Enjo or an existing customer.
Step 1 — Use the Help Center Agent
Click Help Center Agent from the left navigation.
Choose a template under Create an Article for example, Getting started guide — or type a free-form prompt into the input at the top.
The Help Center Agent generates the article showing its reasoning steps research, source grounding, and template guidance.
Review the article summary in the Review changes panel.
Click Save all as draft.
The article appears in the left navigation under its collection, marked Draft and Not Published.
💡 The more specific your prompt or clarification, the more accurate and on-brand the generated article will be.
Step 2 — Review and edit the article
Click the article in the left navigation to open it in the editor.
Review the content check facts, adjust tone, and add any missing information.
Use the block editor to format type
/to open the slash command menu for headings, lists, callouts, images, and more.
Step 3 — Configure article settings
Click the gear icon in the top right of the article editor to open the Settings panel.
Information View article metadata — author, creation date, last updated date, and last updated by.
SEO Settings
Setting | What it does |
|---|---|
URL Slug | The URL path for this article — auto-generated from the title. Edit to make it shorter or more descriptive. |
URL Aliases | Add old slugs that permanently redirect (301) to this article. Useful when renaming an article or migrating from another tool. |
Meta Title | The title shown in search engine results. Keep it under 60 characters. |
Meta Description | The description shown in search engine results. Keep it under 160 characters. |
Search Preview | A live preview of how this article will appear in Google and other search engines. |
Hide article | When enabled, the article is excluded from collection listings in the portal. |
💡 Fill in the Meta Title and Meta Description before publishing. A clear, specific meta description improves how your articles appear in search results.
💡 Use URL Aliases whenever you rename an article or change its slug. This prevents broken links if the article was previously shared or indexed.
Step 4 — Publish the article
Click Publish in the top right corner.
The article status changes from Draft to Published and is now live and visible in your Help Center portal.
💡 To take a published article offline, click the dropdown next to Publish and select Unpublish Article. This moves the article back to Draft and removes it from the portal immediately.
Available article templates
Create an Article
Template | Use when |
|---|---|
Getting started guide | New customers need to reach first success in under 5 minutes |
How-to guide | Step-by-step instructions for completing a specific task |
Feature explainer | Introducing a feature — what it does, who it's for, and how to use it |
Concept explainer | Explaining a core concept, term, or mental model |
Troubleshooting guide | Diagnosing and resolving a specific issue with paired causes and fixes |
FAQ article | Grouping the most-asked questions on a topic with concise answers |
Integration setup | Step-by-step setup for connecting your product with a third-party tool |
Document a workaround | Helping users achieve something not natively supported |
Update Articles
Template | Use when |
|---|---|
Replace a term in an article | Swapping an old term or product name for a new one |
Update a link in an article | Replacing an old URL with a new one |
Refresh an outdated article | Verifying an article against the current product and rewriting stale content |
Document a release | Turning release notes or a changelog entry into a customer-facing article |
What's next
Creating and Managing Content — Create articles manually, use the Help Center Agent, and manage article lifecycle.
Configuration and Branding — Set up your logo, colors, domain, and AI Assistant widget.
Connecting a Custom Domain — Add your own domain to your Help Center portal.