Stripe
In this article, you'll learn how to connect Stripe to Enjo using Model Context Protocol (MCP), enabling your AI Agent to query payment data and perform payment operations in real time.
Note: This integration requires admin or Owner access in both your Stripe account and your Enjo workspace.
How this works
Stripe MCP is an AI action in Enjo — meaning your AI Agent can query and operate on your Stripe data in real time during customer interactions. The connection uses bearer token authentication and requires your Stripe API secret key.
Once connected, your AI Agent can:
Look up customer payment history
Retrieve invoice details
Check payment status
Create charges and refunds
Manage customer payment methods
Resolve billing and payment disputes with accurate data
What is Model Context Protocol (MCP)?
MCP is an open standard that enables AI systems to safely connect to external APIs and tools. Instead of hardcoding integrations, MCP provides a secure, standardized way to give AI Agents access to services like Stripe.
Key benefits of MCP:
Secure — APIs are accessed via authenticated bearer tokens, not embedded credentials
Standardized — Same protocol across all MCP integrations (Stripe, future integrations, etc.)
Flexible — Add or remove MCP integrations without code changes
Auditable — All AI Agent actions through MCP are logged for compliance
Before you start
Prerequisites:
Admin or Owner role in Enjo workspace
Stripe account with API access
Access to Stripe Developer Settings
Choose your environment:
Test mode — Use test API keys during development and testing
Live mode — Use live API keys only after testing is complete
ℹ️ Tip: Start with Stripe Test mode to safely verify your AI Agent's payment operations before enabling live transactions.
Step 1: Access App Integrations in Enjo
Log in to your Enjo workspace.
Navigate to Settings > Apps.
Click the Connect Apps tab (or Apps tab depending on your UI version).
You'll see a list of available integrations.
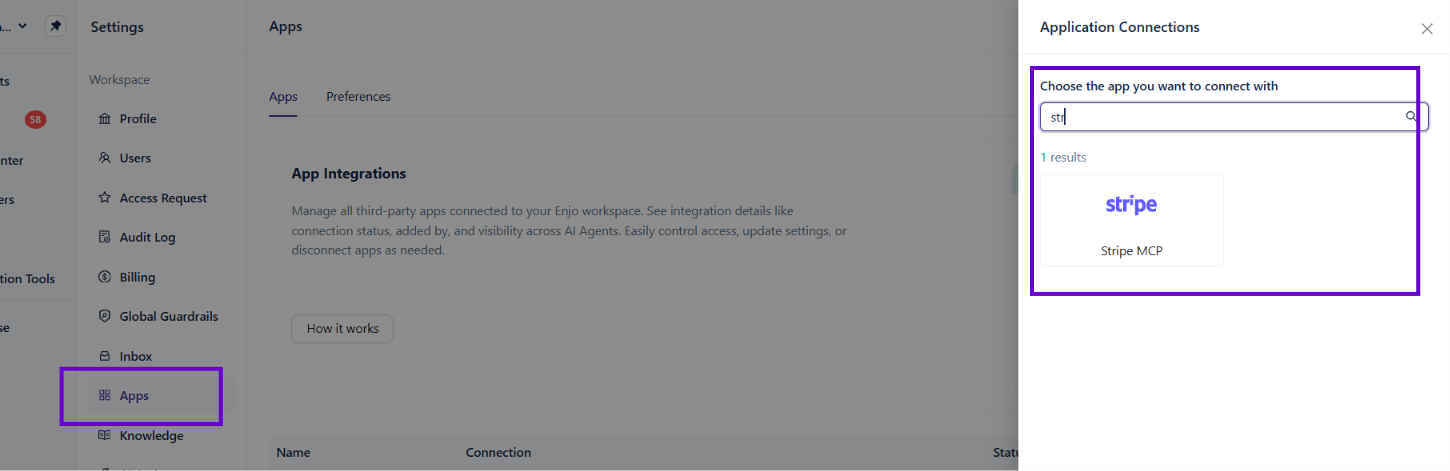
Step 2: Search for Stripe MCP
In the App Integrations list, search for Stripe MCP.
Click Stripe MCP to open the connection form.
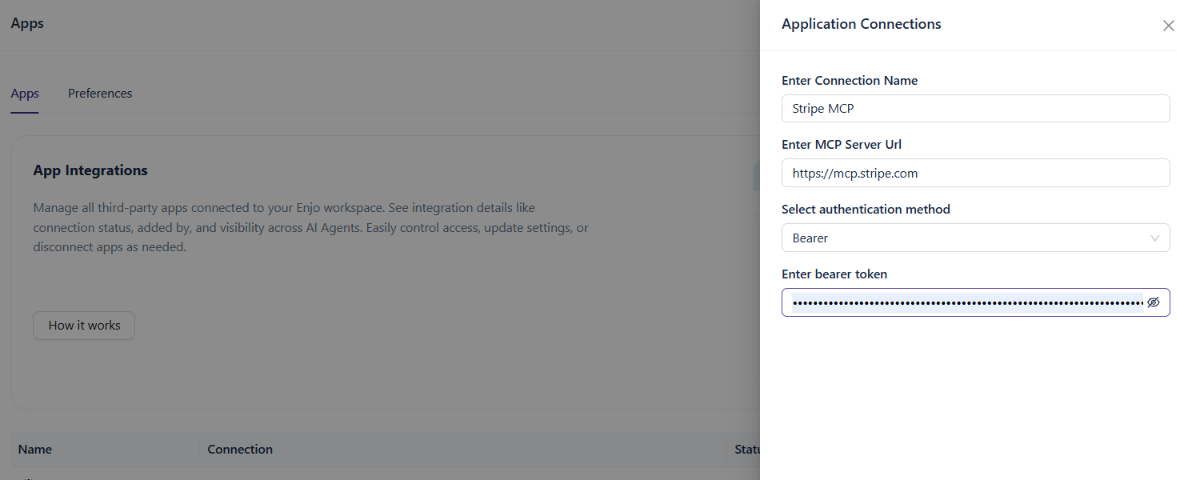
You'll see the MCP connection form with the following fields:
Enter Connection Name — Give your connection a name (e.g., "Stripe Payments")
Enter MCP Server URL — Pre-filled with Stripe's MCP endpoint
Select Authentication Method — Set to "Bearer"
Enter Bearer Token — Your Stripe API secret key
Step 3: Retrieve your Stripe API secret key
Your Stripe API secret key is required to authenticate the connection.
In your Stripe account:
Log in to Stripe Dashboard.
Navigate to Developers > API Keys (in the left sidebar).
You'll see two API key types:
Publishable key — Safe to use in public (frontend code)
Secret key — Keep private; used for backend and AI operations
You need the Secret key.
Toggle between Test mode and Live mode (top left) depending on which key you want to use.
Click the Reveal button next to the Secret key.
Copy the secret key (starts with
sk_test_for test mode orsk_live_for live mode).
⚠️ Warning: Your secret key is sensitive. Treat it like a password:
Never share it publicly or with anyone outside your organization
Never commit it to version control
Rotate it regularly in Stripe Developer Settings if you suspect it's been exposed
Step 4: Enter the bearer token in Enjo
Return to the Stripe MCP connection form in Enjo.
In the Enter Bearer Token field, paste the Stripe secret key you copied.
Enter Connection Name — Optionally customize the connection name (e.g., "Stripe Test" or "Stripe Live").
Verify that Select Authentication Method is set to Bearer.
Click Submit.
Step 5: Confirm the connection
After clicking Submit, Enjo will validate the bearer token with Stripe. You'll see:
Success notification — "MCP connection successful" (green banner)
Connection listed — Your new Stripe MCP connection appears in the App Integrations list
Status — Shows as "Active" (green)
The connection is now live and your AI Agent can use Stripe actions.
Verify the connection is working
To test your Stripe MCP connection:
Go to AI Agents in your Enjo workspace.
Create a new AI Agent or edit an existing one.
Navigate to AI Actions or MCP Actions section.
Search for Stripe in the available actions.
You should see Stripe payment actions available (e.g., "Look up customer," "Retrieve invoice").
Add a test action and ask your AI Agent a payment-related question:
"What is our customer's invoice status?"
"Retrieve the most recent payment for customer XYZ"
The AI Agent should retrieve data from Stripe and return the answer.
If the connection fails, see the troubleshooting section below.
Manage your connection
From the App Integrations list, you can:
Action | How |
|---|---|
View details | Click the connection name to see configuration |
Edit connection name | Click the three-dot menu (⋯) > Edit |
Change bearer token | Click the three-dot menu (⋯) > Edit and paste a new secret key |
Delete connection | Click the three-dot menu (⋯) > Delete |
Check status | Look at the Status column (Active = green) |
Test mode vs. Live mode
Test mode (Recommended for setup):
Use Stripe test API keys (start with
sk_test_)No real charges are created
No real customers are affected
Safe for developing and testing your AI Agent
Use this first to verify everything works
Live mode (Only after testing):
Use Stripe live API keys (start with
sk_live_)Real charges are created
Real customer data is accessed
Production environment
Only switch to live after thorough testing
How to switch between modes:
In Stripe Dashboard, toggle View test data (top left)
In Developer Settings, you'll see separate API keys for test and live
In Enjo, you can maintain two separate MCP connections: one for test, one for live
Your AI Agent can be configured to use either connection
💡 Tip: Create two MCP connections in Enjo—one for Stripe Test mode and one for Stripe Live mode. This lets you safely test changes before pushing to production.
Security best practices
Protect your secret key:
Store secret keys in a secure location (only share with Enjo)
Rotate keys regularly (especially if anyone left your team)
Use test keys during development
Review Stripe logs to monitor AI Agent activity
Never commit API keys to version control
Never share API keys in emails or chat
Never use the same key across multiple workspaces
Review AI Agent permissions:
By default, AI Agents with access to Stripe MCP can perform any action that the API key allows
Consider what payment operations your AI Agent really needs
Test thoroughly in Test mode before enabling in Live mode
Monitor activity:
Check Stripe Dashboard > Logs regularly to see what operations your AI Agent has performed
Set up Stripe alerts for unusual activity
Audit your Enjo audit log to track which AI Agents accessed Stripe
Troubleshooting
"Bearer token invalid" error
Check that:
You copied the entire secret key (should start with
sk_test_orsk_live_)There are no extra spaces before or after the key
You're using the Secret key, not the Publishable key
The key hasn't been revoked in Stripe Developer Settings
"Connection failed" or timeout
Check that:
Your Stripe account has API access enabled
You're using the correct Stripe environment (test vs. live)
Enjo has network access to Stripe's servers (no firewall blocks)
AI Agent can't access Stripe actions
Check that:
The connection status shows "Active" (green)
The AI Agent is configured to use the Stripe MCP connection
You've added Stripe actions to the AI Agent's action set
"Permission denied" when running a Stripe action
This usually means:
The API key doesn't have permission for that action
The action requires Live mode, but you're using a Test key (or vice versa)
The Stripe account doesn't have the feature enabled (e.g., Connect, Issuing)
Check your Stripe account settings and verify the API key has the necessary permissions.
What's next
Stripe MCP Actions — Learn what actions your AI Agent can perform with Stripe
Using AI Actions — Configure your AI Agent to use the Stripe connection
Audit Log — Track all AI Agent activity for compliance