Connecting Salesforce Cases as your ticketing app lets your AI Agent create and manage support cases directly from a conversation. When a request comes in that needs a case, the AI Agent files it in Salesforce with the right record type and fields, and keeps the conversation in sync as the case is updated.
This guide walks you through configuring Salesforce ticketing for an AI Agent: connecting your Salesforce account, adding request types, setting field defaults, and turning on escalation to Salesforce.
Before You Start
You need a Salesforce account connected to Enjo. If you haven't connected one yet, set it up first using Salesforce Cases or Salesforce Sandbox, depending on your environment.
The record types you want to use should already exist in your Salesforce Cases setup. Enjo pulls request types directly from these record types, it doesn't create them.
You'll need Admin access to the AI Agent you're configuring.
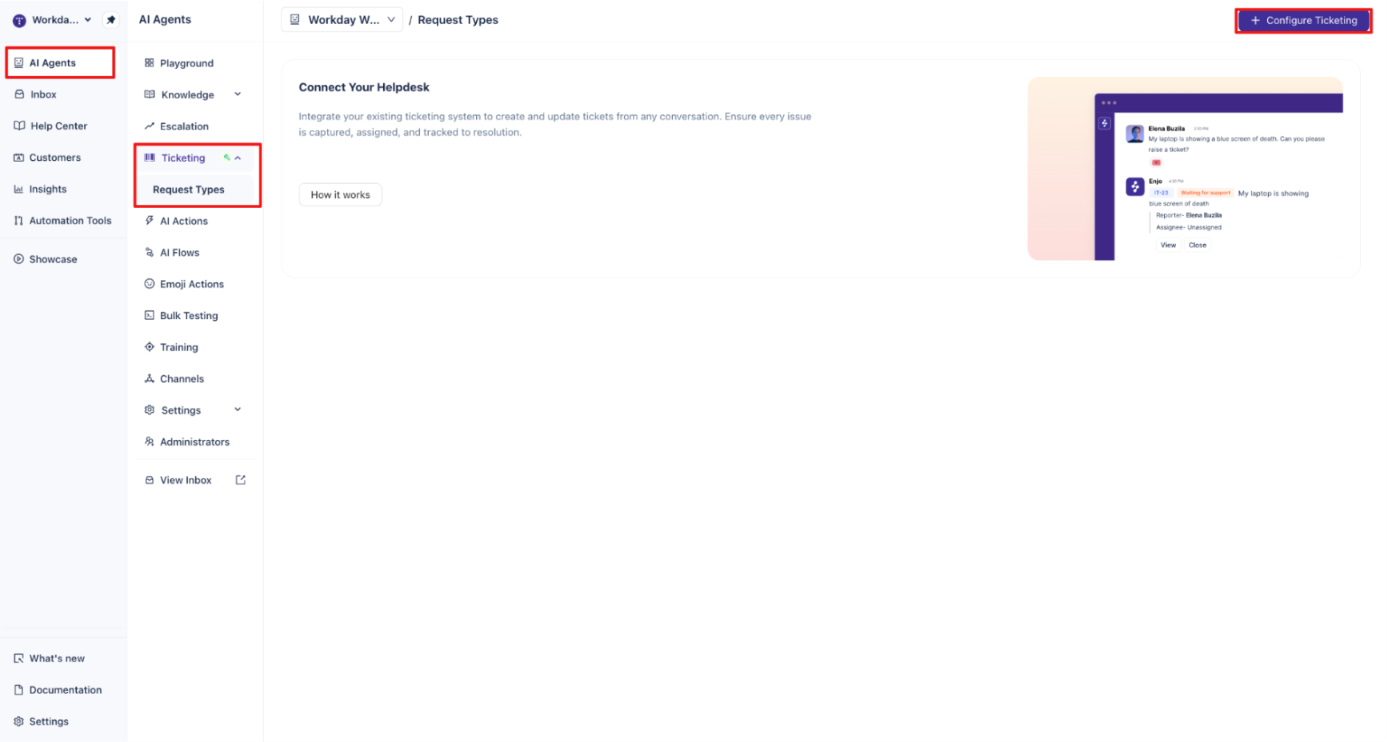
From your Enjo dashboard, go to AI Agents and select the agent you want to configure.
In the left navigation, go to Ticketing > Request Types.
Click Configure Ticketing in the top right corner.
2. Connect your Salesforce account
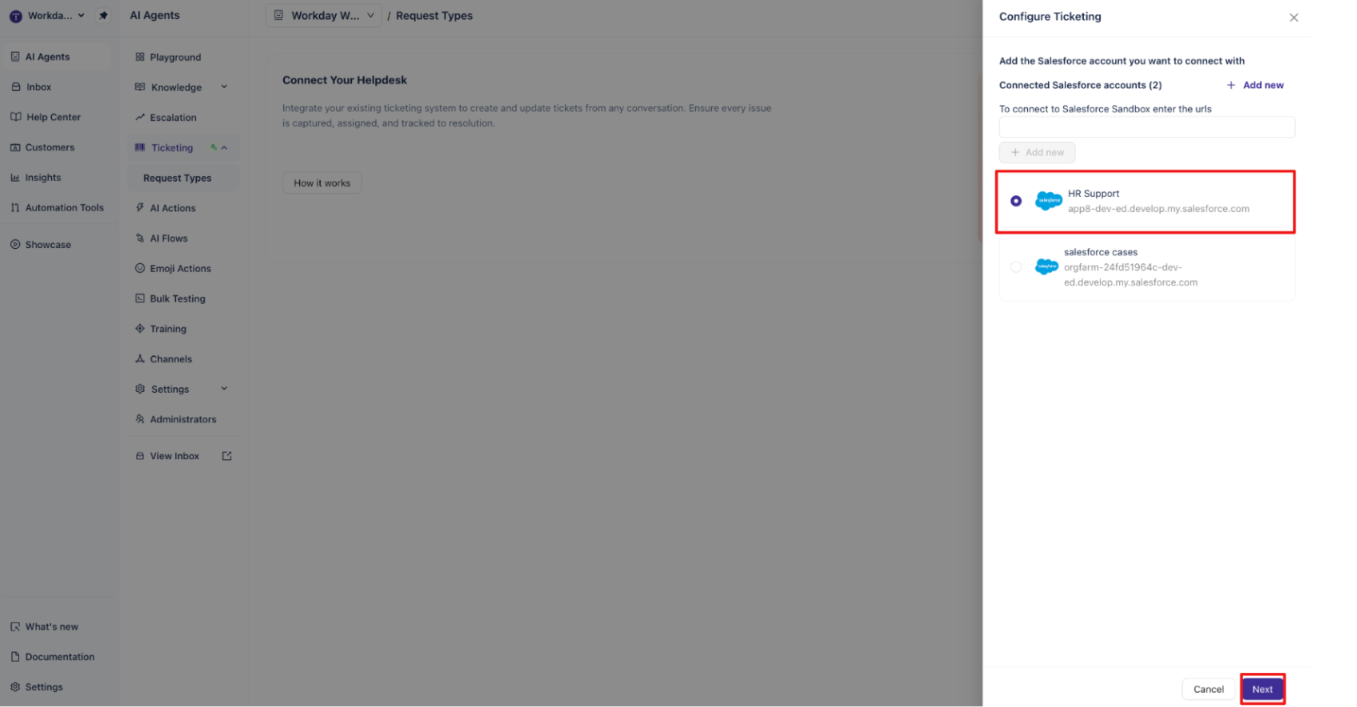
From the list of apps, select Salesforce Cases.
If you already have a Salesforce account connected, select it from the list and click Next.
If you haven't connected one yet, click +Add New or enter your Salesforce Sandbox URL to start the connection. Follow the same authorization steps described in the Salesforce Cases setup guide.
💡 Tip: You can connect more than one Salesforce account to an AI Agent. Make sure you select the one that has the record types you plan to use.
3. Add request types
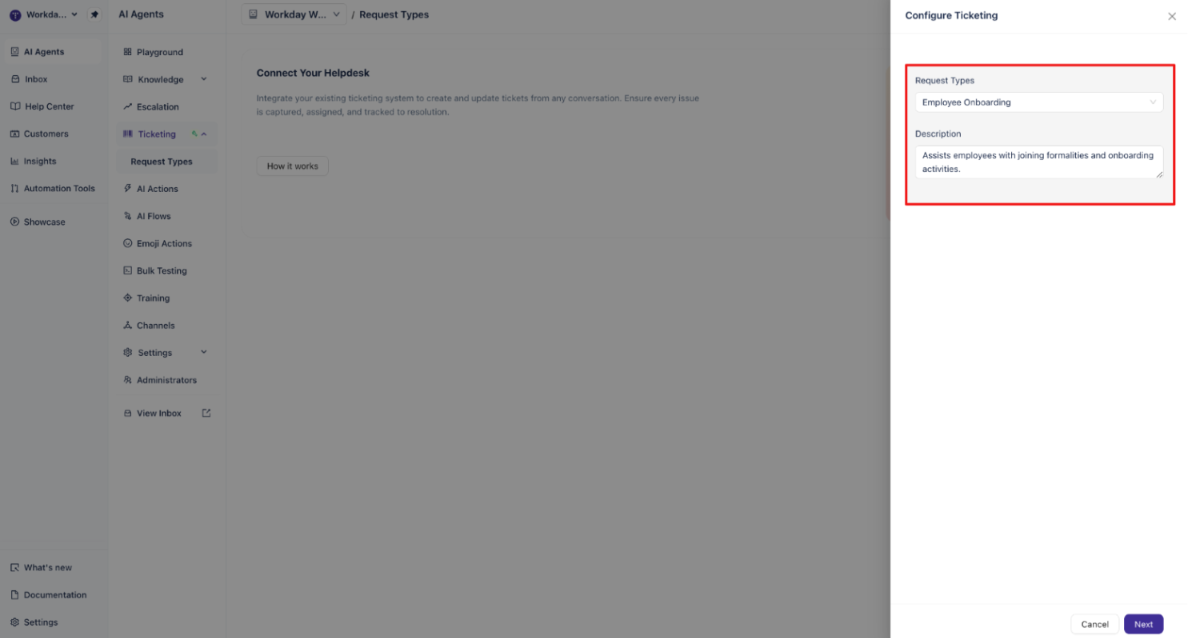
Salesforce ticketing in Enjo is organized by record type. Click through the list of record types pulled from your Salesforce Cases setup and select the ones you want to use as request types, for example, Payroll & Benefits or IT Support.
Each record type brings over its description from Salesforce automatically. Click Next once you've made your selections.
Note: If a record type you expect to see isn't listed, confirm it's marked active in your Salesforce Cases configuration.
4. Add sample requests
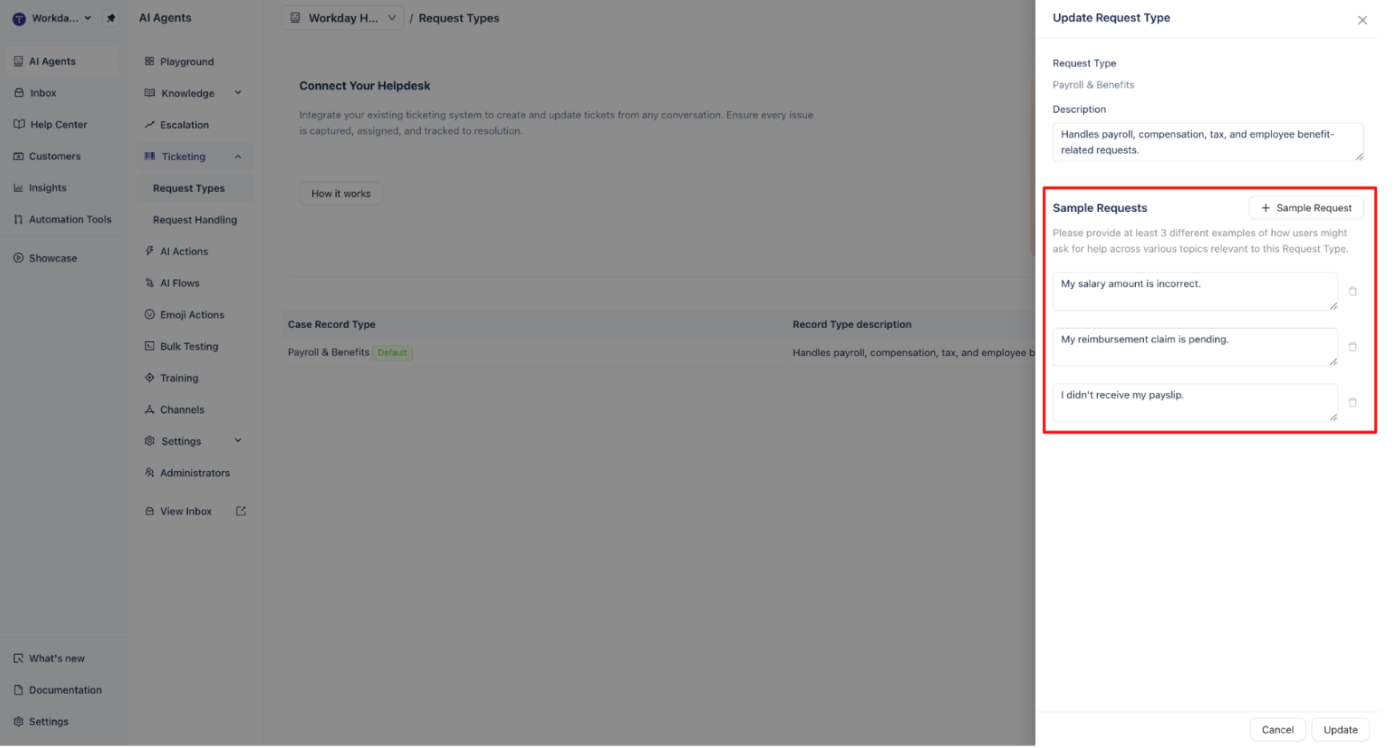
Open a request type and add a few sample requests that show how an employee or customer might phrase that kind of issue, for example, "My laptop screen is cracked" for an IT hardware request type.
These samples help the AI Agent recognize when a conversation matches that request type and trigger the right case.
Add as many samples as you need, then click Update to save.
💡 Tip: Vary the phrasing across your sample requests. The more natural variety you give it, the better the AI Agent gets at matching real user language to the right request type.
5. Manage fields for each request type
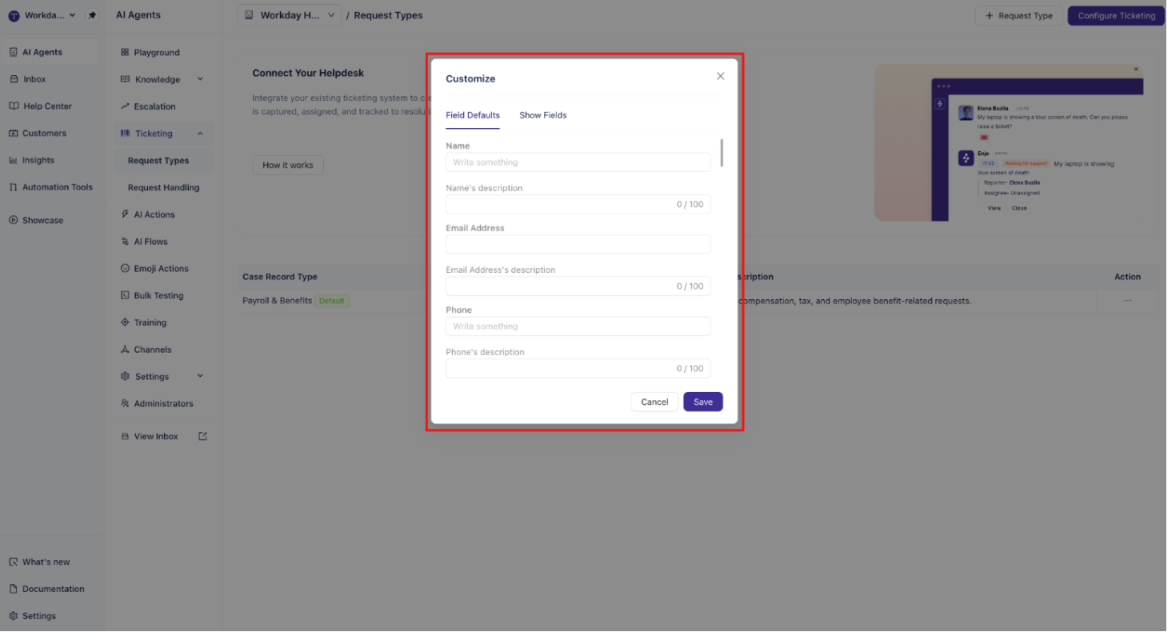
Open the request type's action menu and review the fields available on that Salesforce case.
Set Field Defaults for values that should populate automatically, and use Show Fields to control which fields appear on the request form.
Mark any fields in Show Fields you want to require if you need specific details from the requester before a case can be created.
Click Save when you're done.
Important: Fields marked as mandatory will block case creation until the requester provides that information, so only require what you actually need.
6. Turn on escalation to Salesforce
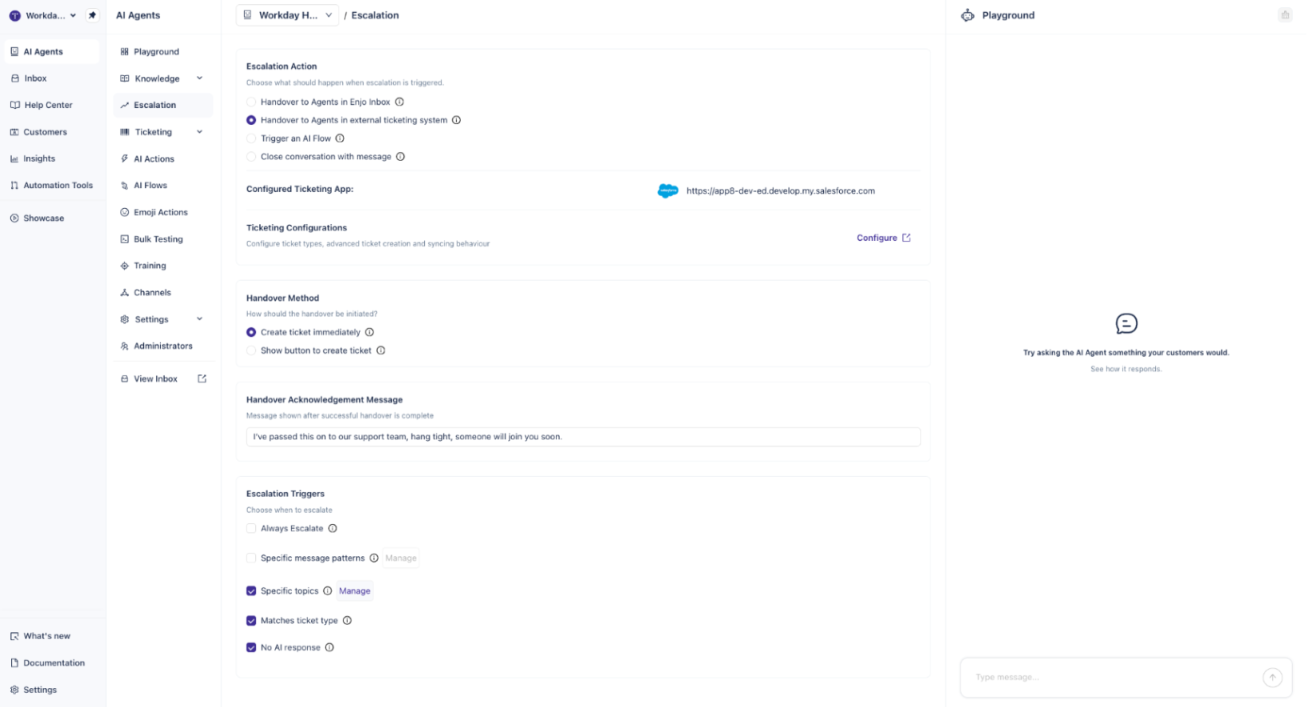
Go to the Escalation tab for respective AI Agent.
Under Escalation Action, choose Handover to Agents in external ticketing system.
Under Configured Ticketing App, confirm your Salesforce connection is listed. If you need to adjust request types or syncing behavior, click Configure next to Ticketing Configurations.
Under Handover Method, choose whether a case is created immediately or only after the requester clicks a button to confirm.
Add a Handover Acknowledgement Message to let the requester know their case has been created, for example, "I've passed this on to our support team, hang tight, someone will join you soon."
Under Escalation Triggers, choose when conversations should escalate. You can escalate on every conversation with Always Escalate, or scope it down using Specific message patterns, Specific topics, Matches ticket type, or No AI response.
Once this is saved, your AI Agent is ready to create and manage Salesforce cases from chat, with conversation context synced to each case.
What's Next
Request Handling Behaviour: Configure how incoming requests are created, routed, and handled once ticketing is set up.