
AI Agent Conversation Behavior
The Conversation Behavior settings in Enjo give you control over how your AI agent interacts with users throughout a conversation: from showing progress indicators while generating a response, to automatically closing inactive threads and collecting satisfaction ratings.
This guide walks you through each setting, what it does, and how to configure it.
Before You Begin
Make sure you have the following before getting started:
Admin or workspace owner access in Enjo
At least one AI agent already created in your workspace
Your AI agent connected to a Slack or Microsoft Teams channel if you want to preview settings live
Step 1: Open Your AI Agent Settings
Log in to the Enjo platform and go to AI Agents from the left navigation.
Click the name of the agent you want to configure.
In the left sidebar, click Settings to expand the menu.
Select Behavior from the submenu.
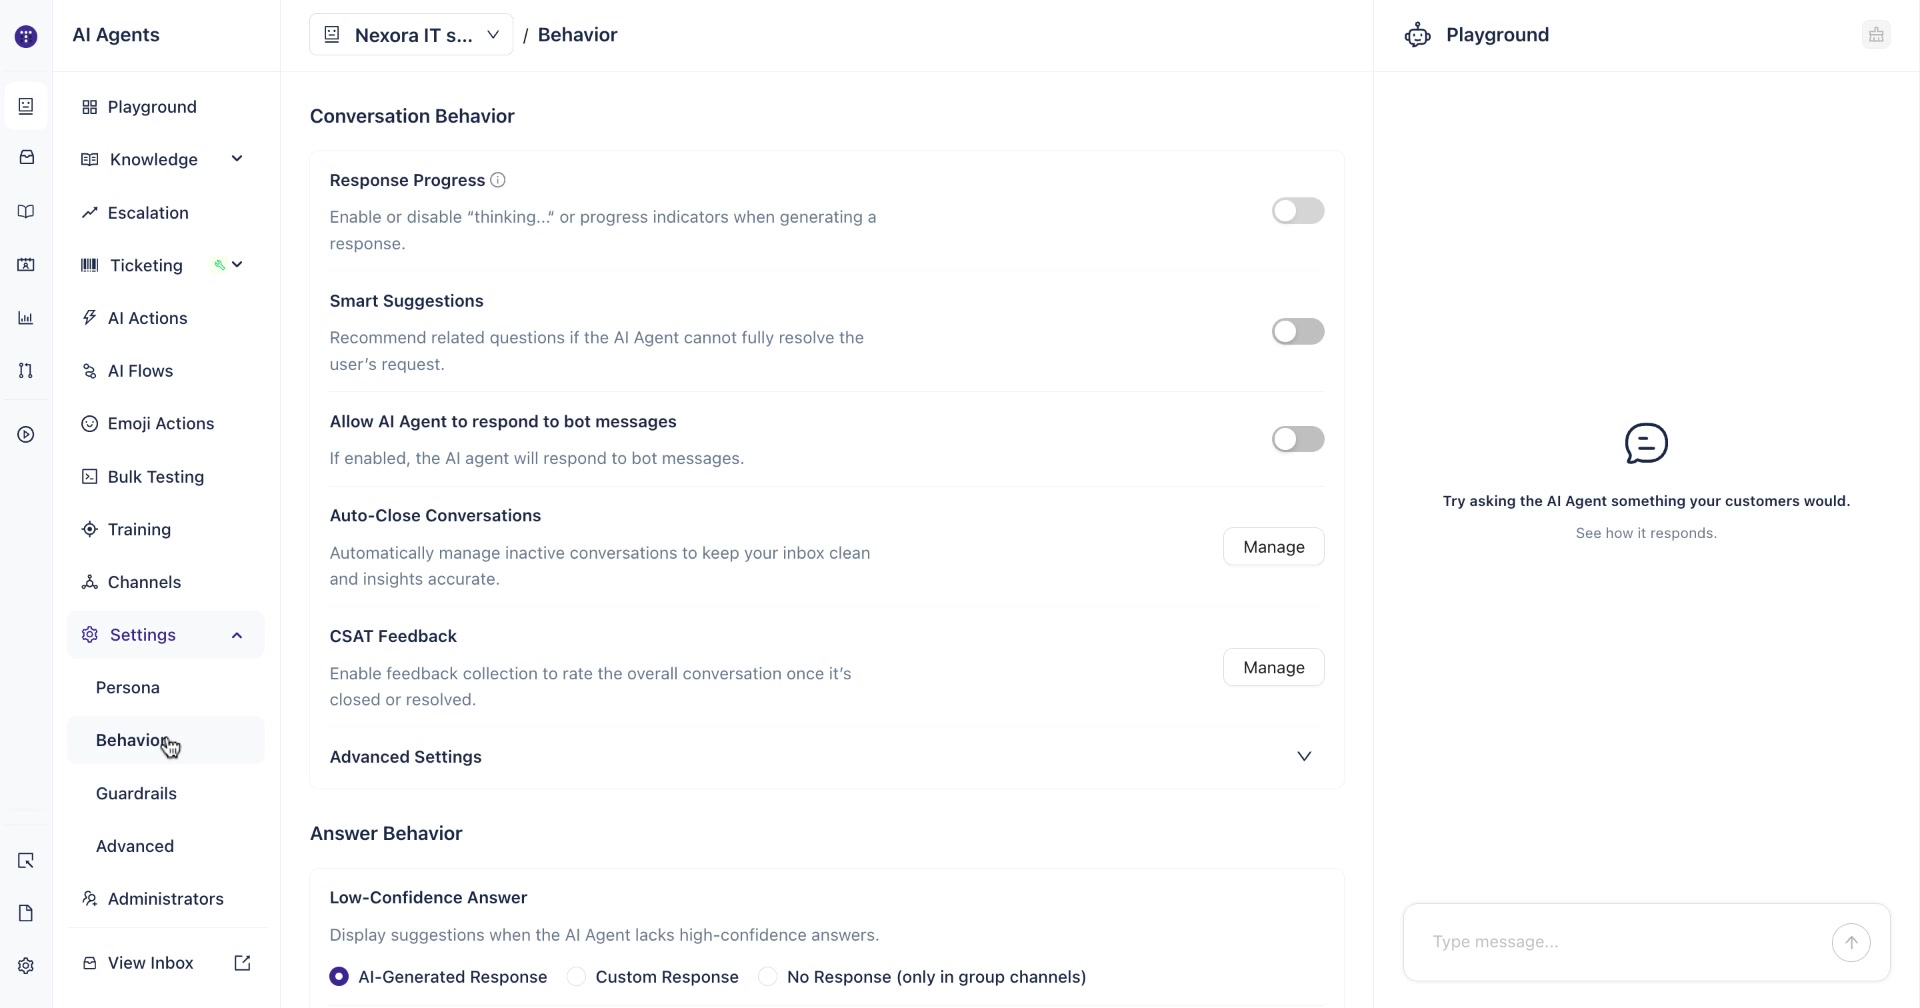
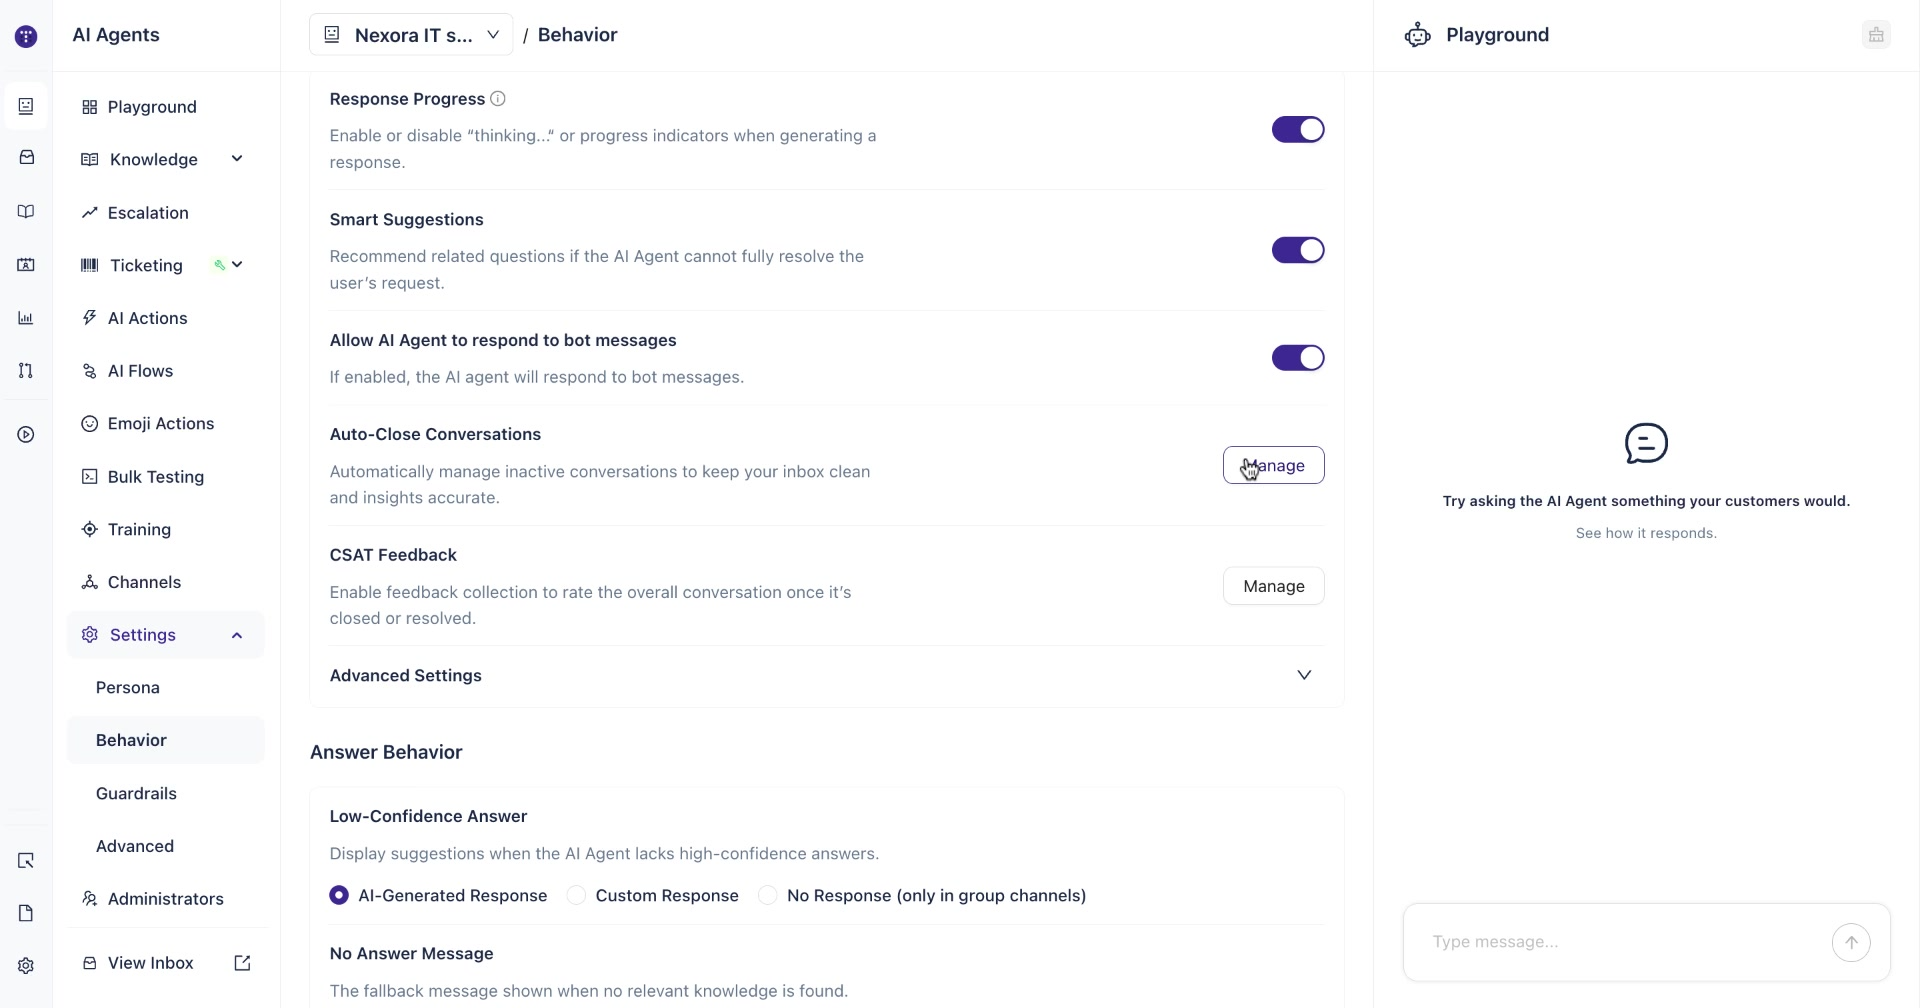
Once you're on the Behavior tab, you'll see the Conversation Behavior section at the top of the page. This is where all the settings in this guide are located.
Step 2: Enable Response Progress
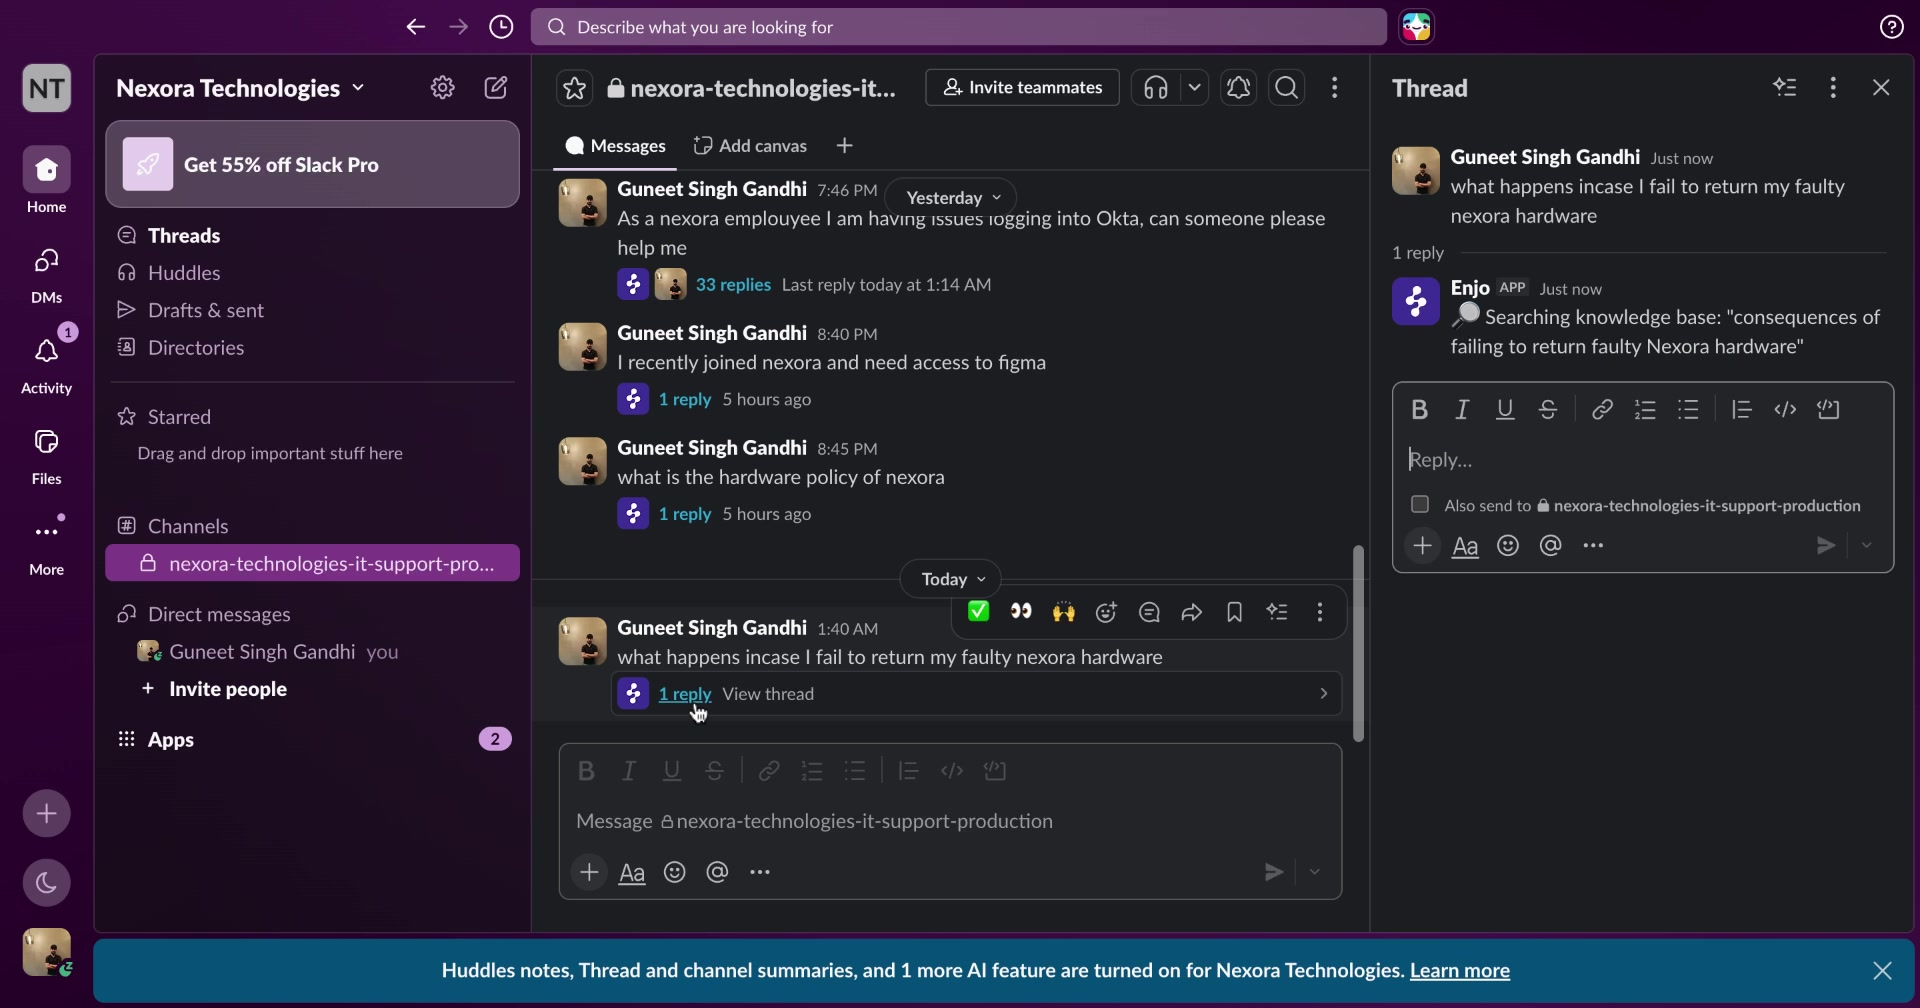
The Response Progress setting displays a live progress indicator in the channel while the AI agent processes a user's question. Users will see status messages such as "Searching knowledge base" or "Retrieving information" before the final answer appears.
To enable it, toggle the Response Progress switch to on.
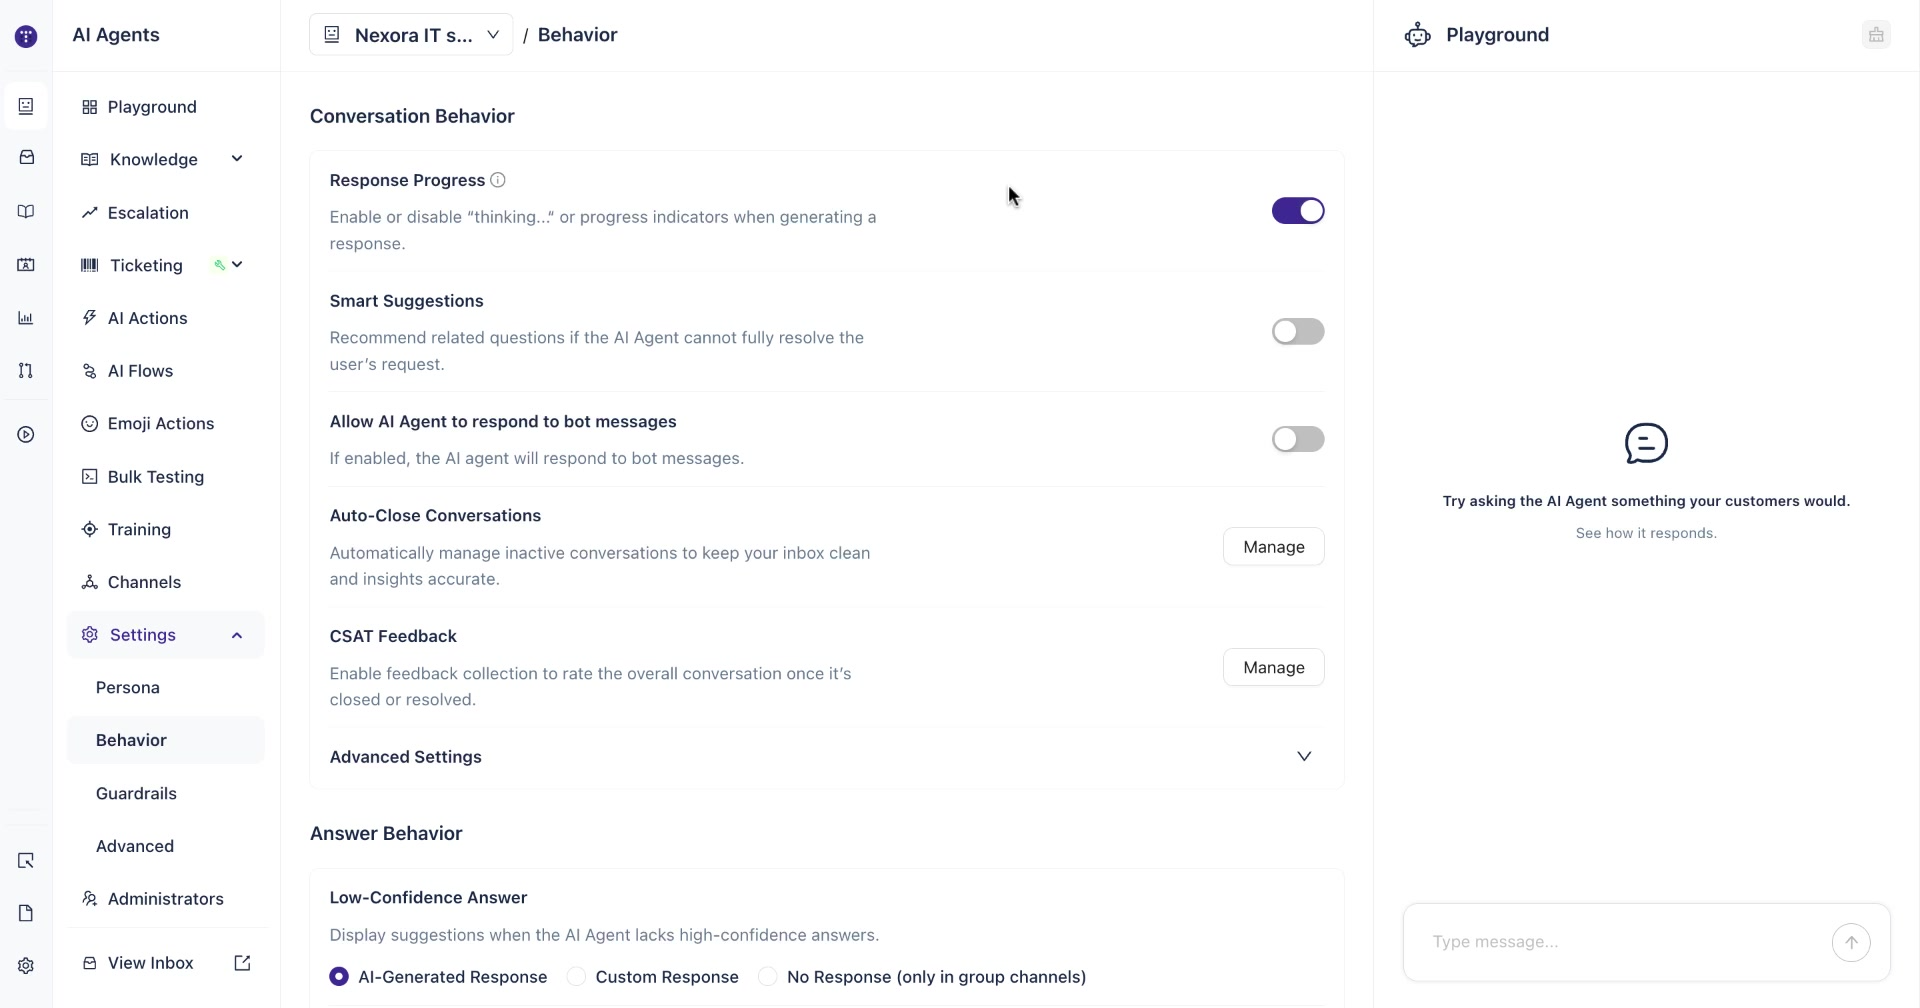
Once active, the progress indicator appears in the Slack or Teams thread as soon as a user sends a message. The placeholder updates in real time and is replaced by the final answer once it's ready.
Note: This setting only applies when your No Answer Message or Low-Confidence Answer settings are configured to use either an AI-generated or custom response. It has no effect if those settings are set to No Response.
Step 3: Enable Smart Suggestions
Smart Suggestions recommends follow-up questions to users when the AI agent can't fully resolve their request. This helps guide users toward related topics that the agent may be able to help with.
To enable it, toggle the Smart Suggestions switch to on.
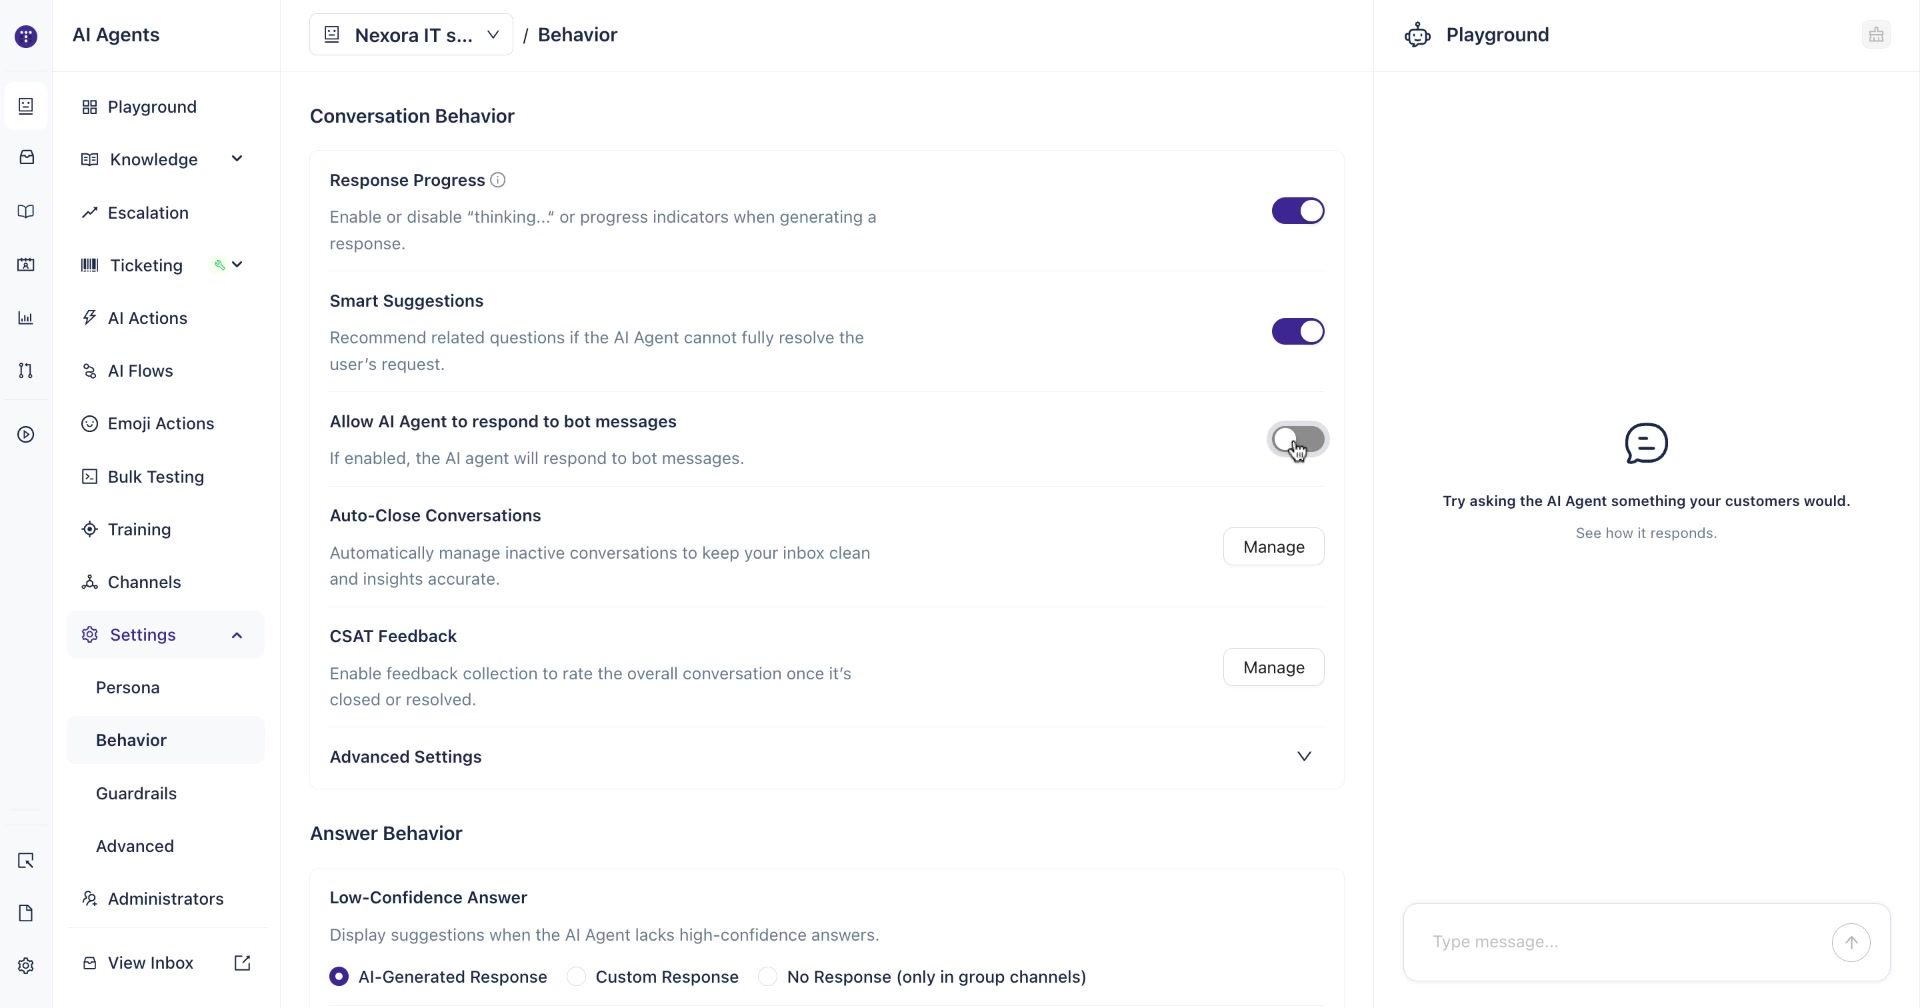
Step 4: Allow AI Agent to Respond to Bot Messages
This setting controls whether your AI agent responds to messages sent by other bots or automated integrations in the same channel.
By default, this is turned off to prevent unnecessary back-and-forth between automated systems. Enable it only if your workflow requires the AI agent to interact with other bots.
To enable it, toggle the Allow AI Agent to respond to bot messages switch to on.
Step 5: Configure Auto-Close Conversations
Auto-Close Conversations automatically closes a thread after a set period of inactivity. This keeps your Enjo inbox clean and ensures your reporting data stays accurate.
To configure it, click Manage next to Auto-Close Conversations.
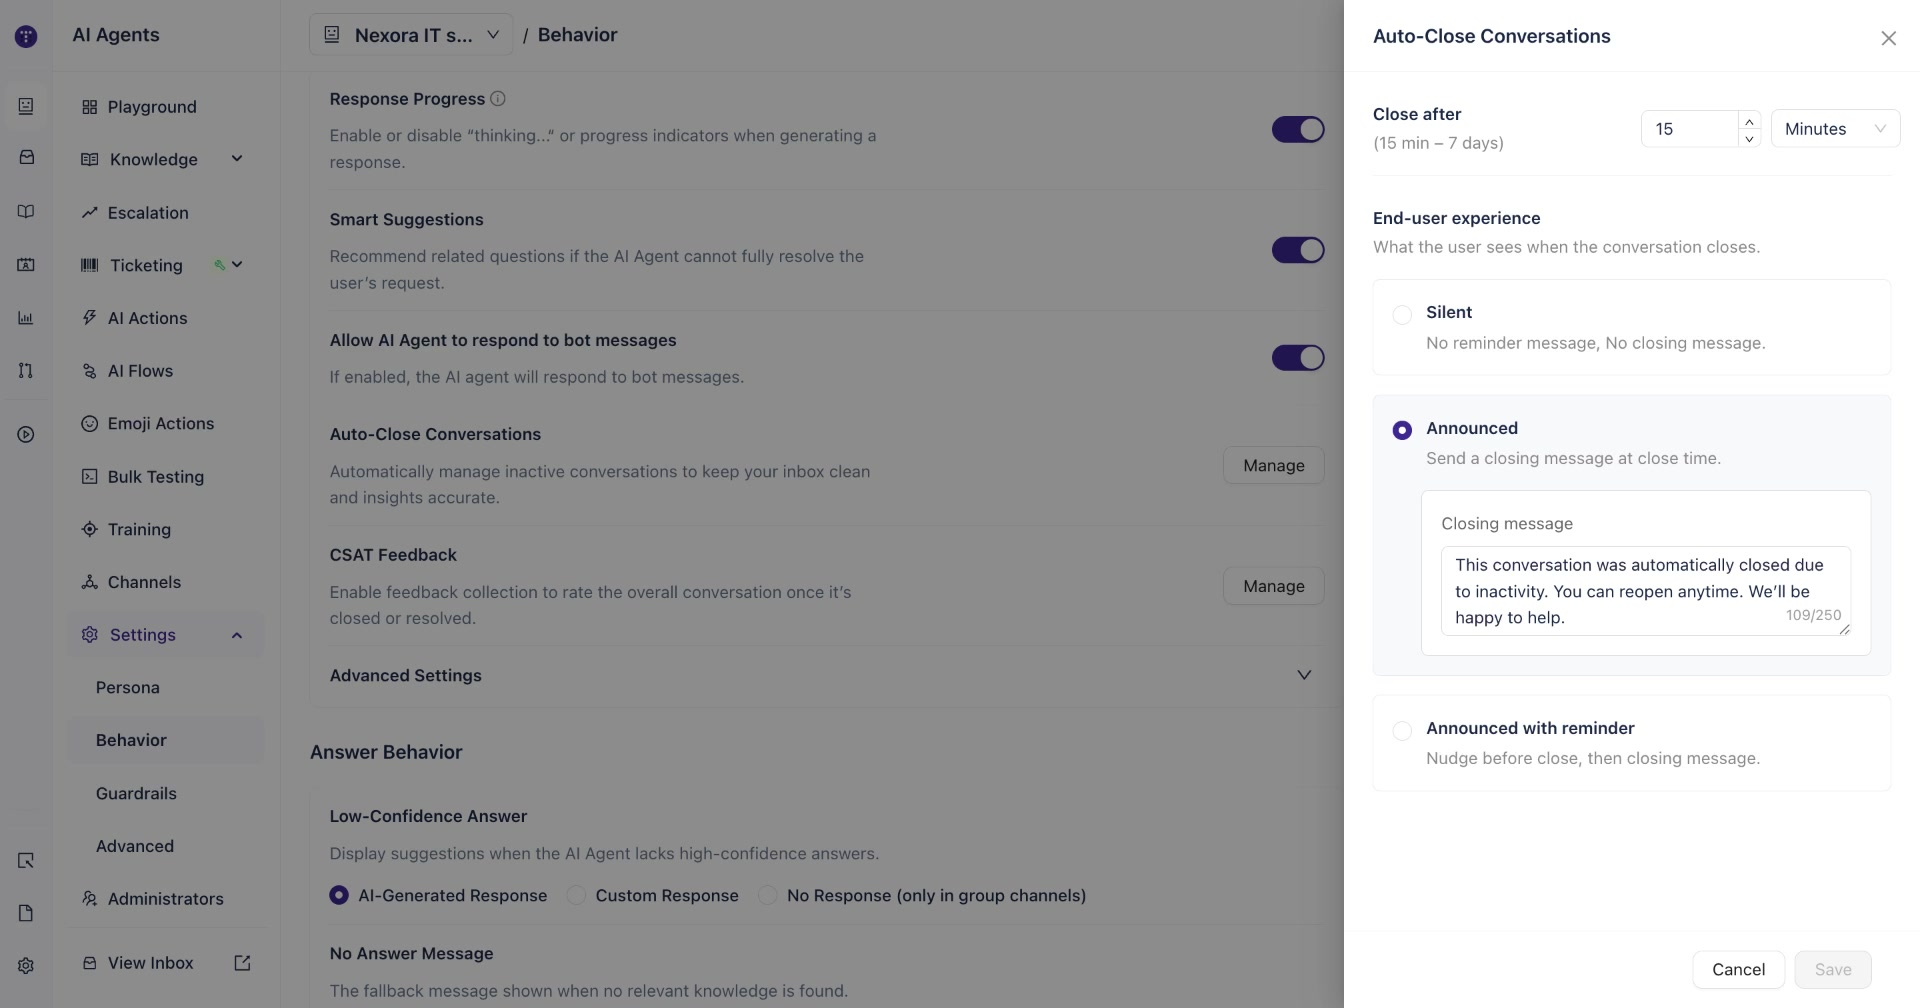
You'll need to set two things:
Close after — Set the inactivity duration. The minimum is 15 minutes and the maximum is 7 days.
End-user experience — Choose what users see when the conversation closes:
Silent — The conversation closes with no message sent to the user.
Announced — A closing message is sent to the user at the time of closure. You can customize this message.
Announced with reminder — A reminder message is sent first (nudging the user to respond), followed by a closing message if there's still no activity. You can customize both messages and set how many minutes after the last user message the reminder is sent.
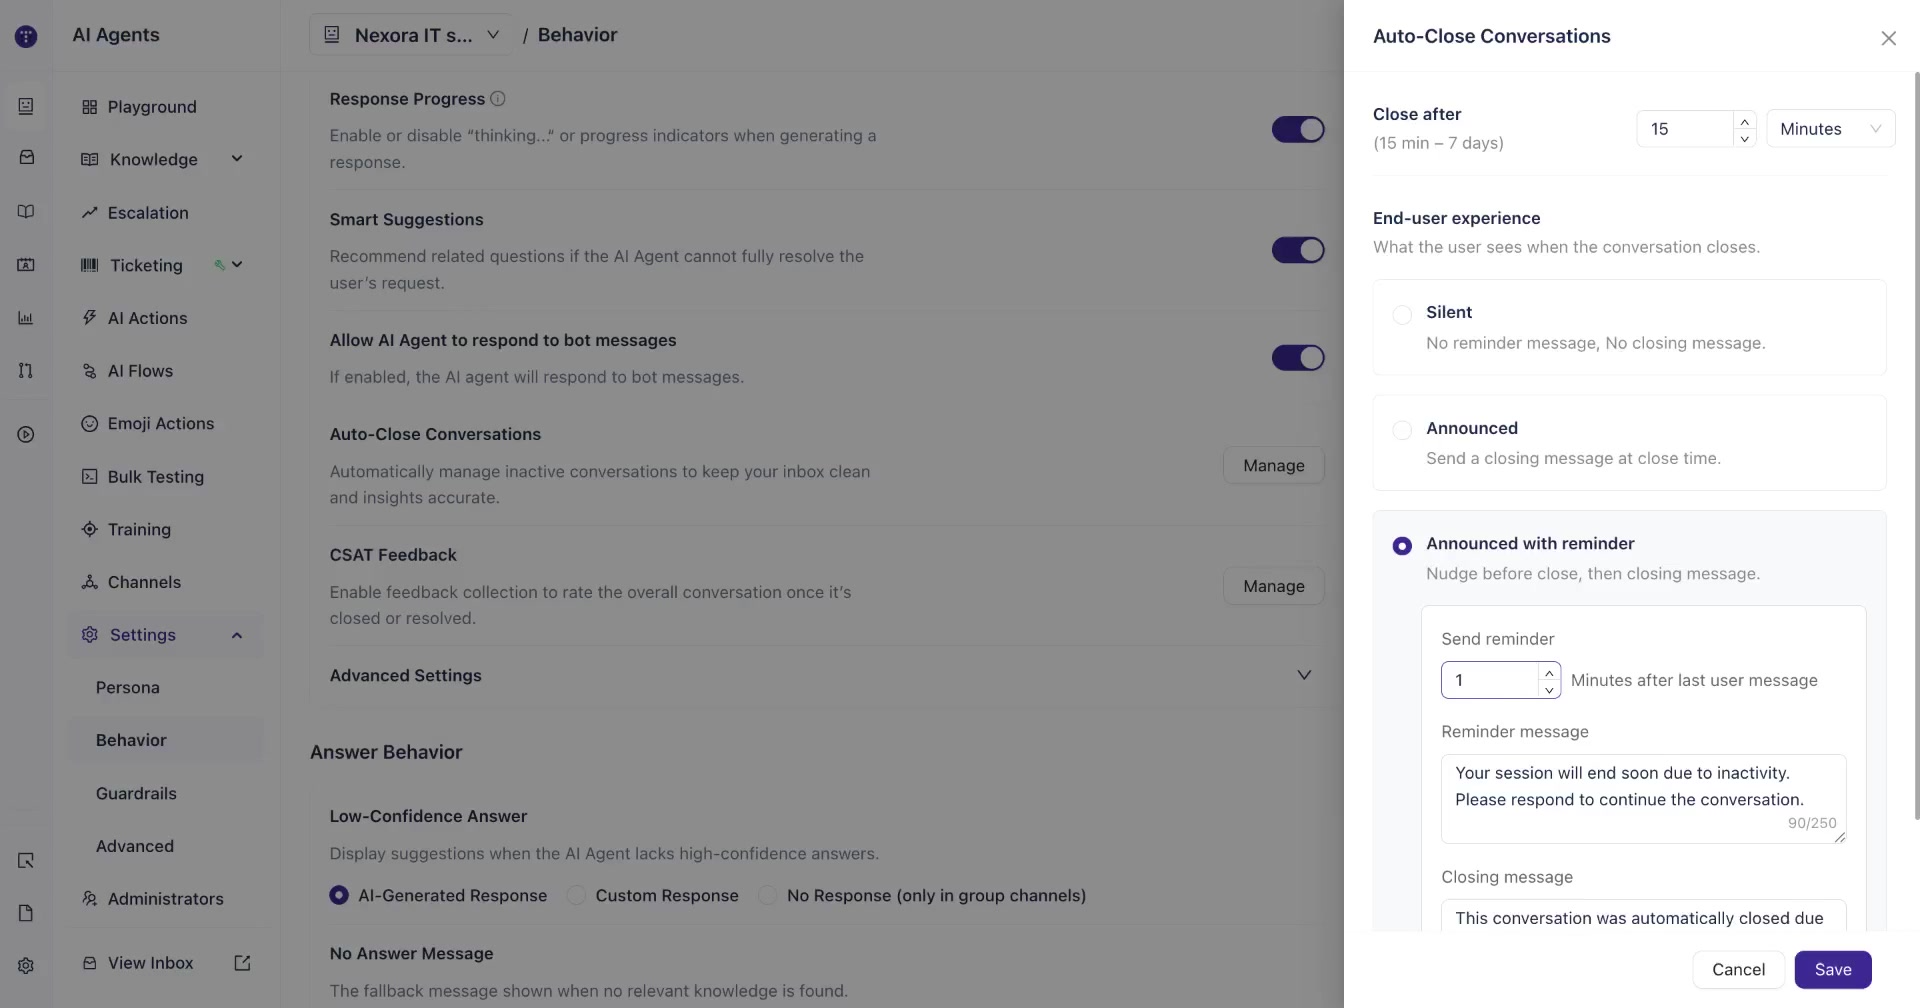
Once you're done, click Save.
Tip: The Announced with reminder option works well for support channels where users may step away mid-conversation. It gives them a heads-up before the thread closes, reducing the chance of missed follow-ups.
Note: The reminder interval must be at least 1 minute less than the total close duration. For example, if your close timer is set to 15 minutes, the reminder can be sent no later than 14 minutes after the last user message.
Step 6: Configure CSAT Feedback
The CSAT Feedback setting lets you collect Customer Satisfaction ratings from users after their conversation with the AI agent is closed or resolved. This gives you a measure of overall support quality across all interactions.
To configure it, click Manage next to CSAT Feedback.
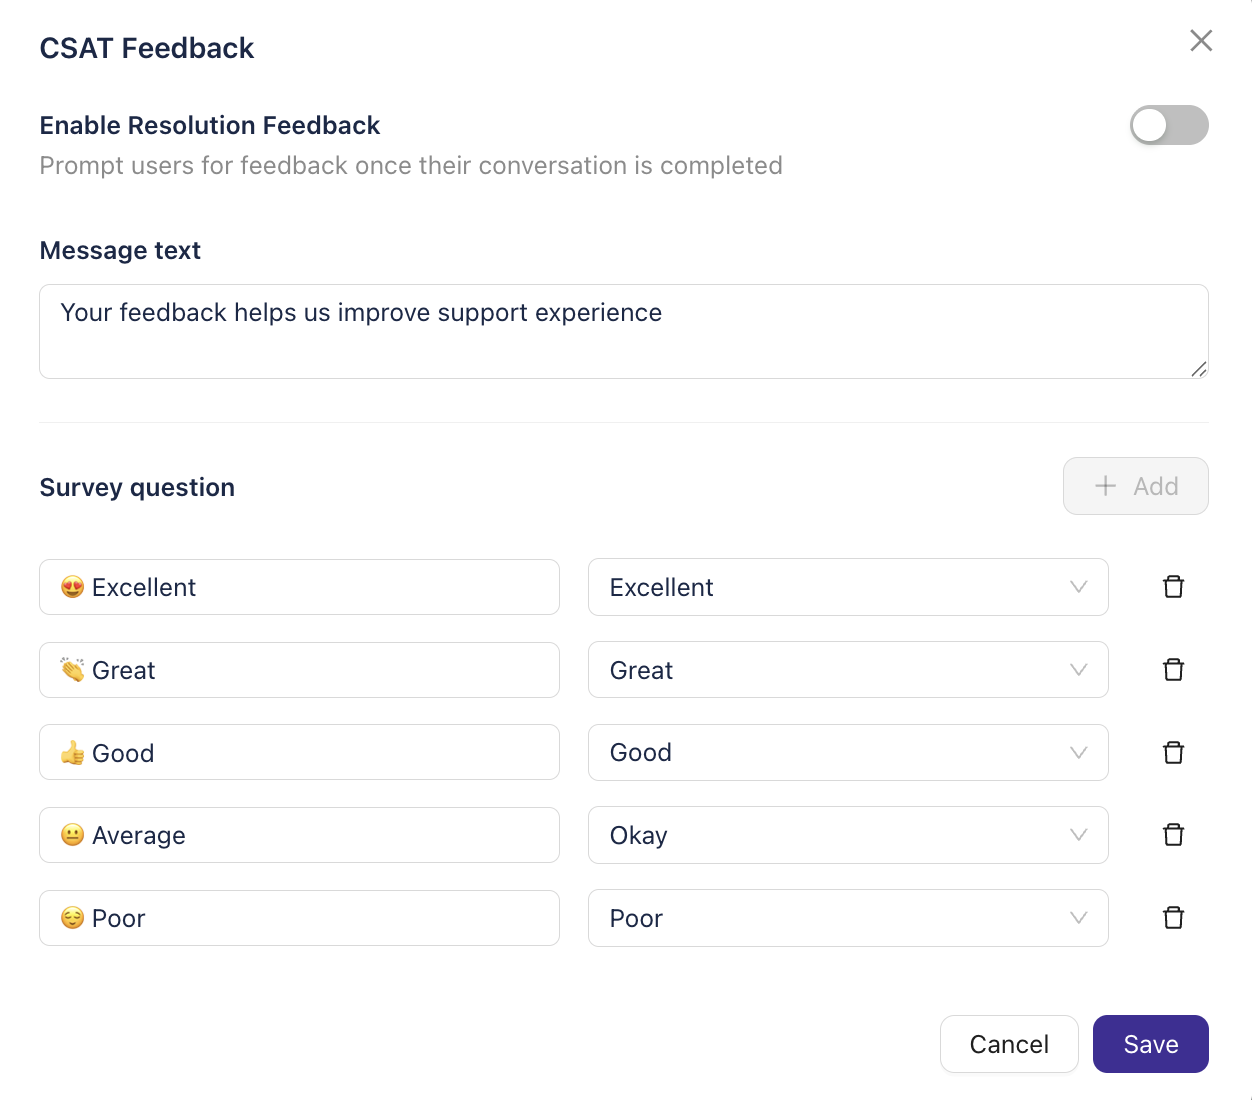
Tip: CSAT Feedback measures the overall conversation experience, while Answer Feedback (found in the Answer Behavior section) measures individual responses.
Seeing It All in Action
Here's a summary of how these settings appear in a live Slack conversation:
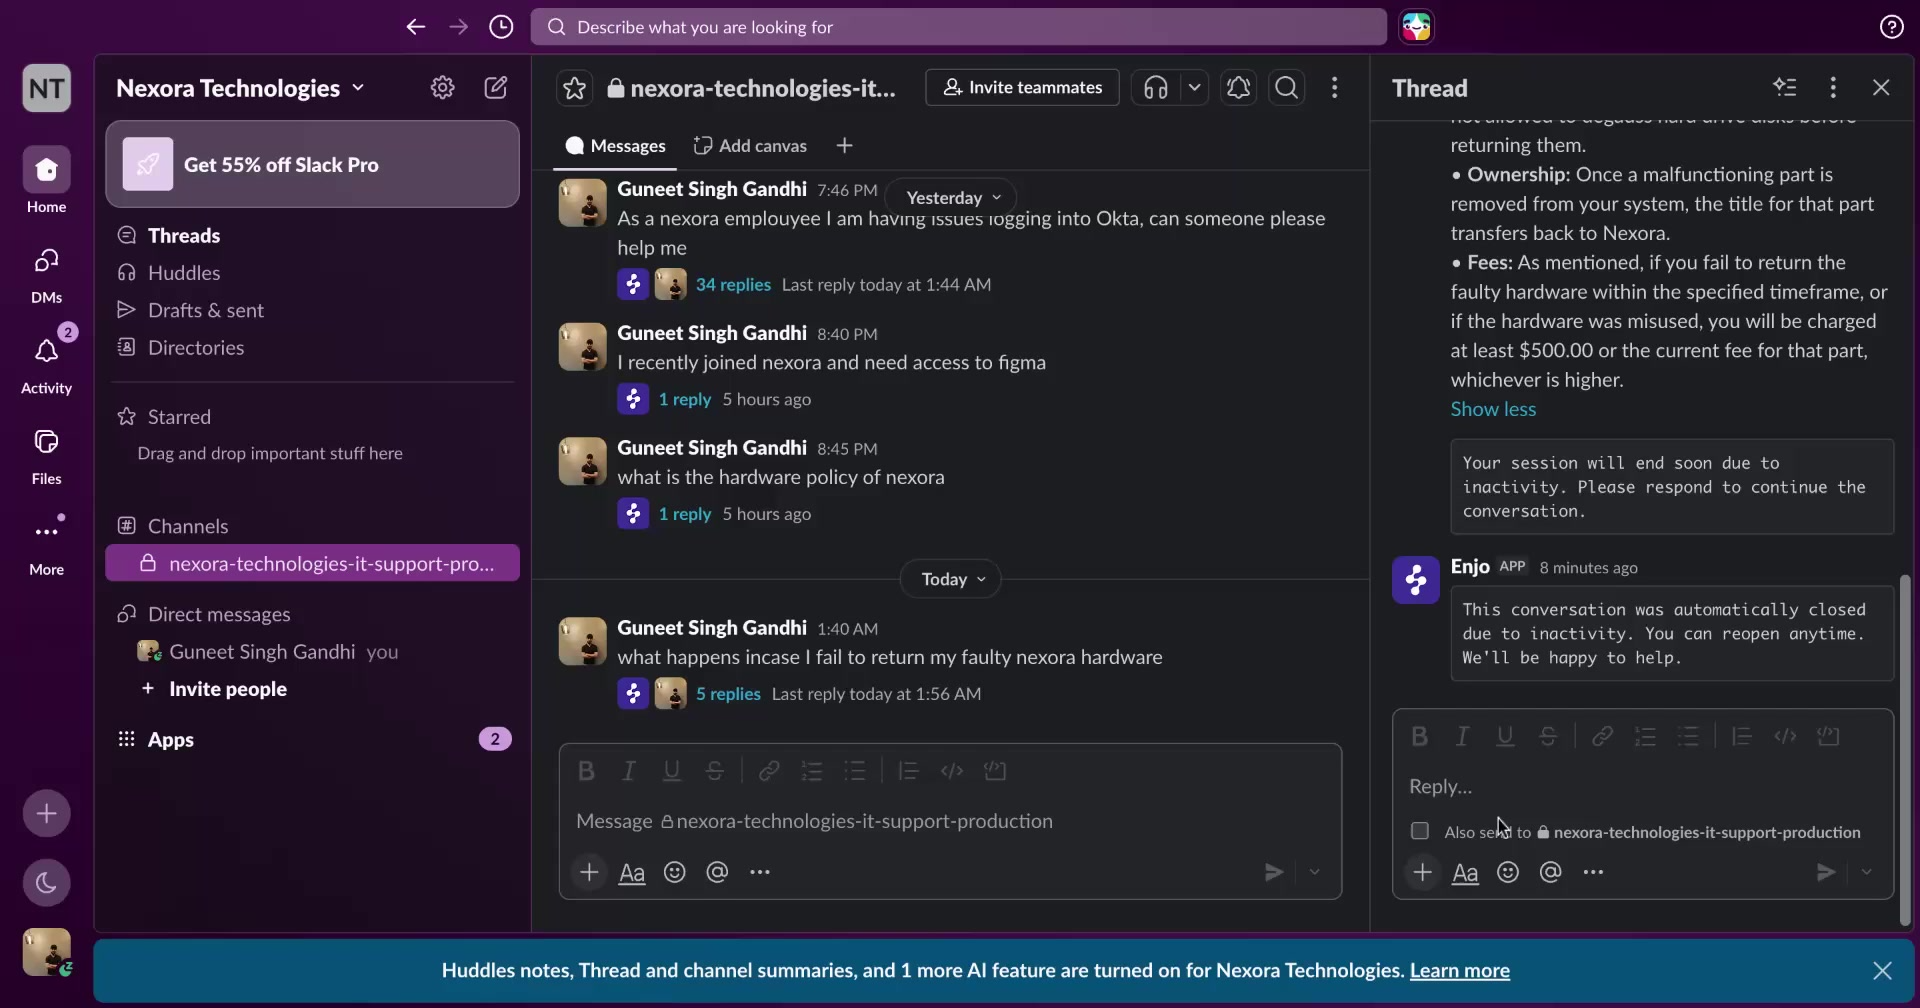
When a user asks a question, the Response Progress indicator appears immediately in the thread, showing what the agent is doing.
Once the answer is ready, the progress message is replaced by the full response.
If the thread goes quiet, the Auto-Close reminder message fires after the configured interval, prompting the user to respond.
If there's still no activity, the closing message is sent and the conversation is automatically closed.
Configuring Advanced Conversation Behavior Settings for Your AI Agent
The Advanced Settings section within Conversation Behavior gives you fine-grained control over how your AI agent interacts in group channels. You can decide when the agent responds, whether multiple users can participate in the same thread, and which messages the agent should ignore entirely.
This guide walks you through each setting and shows you how they work in Slack.
Before You Begin
Make sure you have the following before getting started:
Admin or workspace owner access in Enjo
At least one AI agent already created and connected to a Slack or Microsoft Teams channel
Familiarity with the Conversation Behavior settings tab
Step 1: Open Conversation Behavior Advanced Settings
Log in to the Enjo platform and go to AI Agents from the left navigation.
Click the name of the agent you want to configure.
In the left sidebar, click Settings, then select Behavior.
Scroll down to the Advanced Settings section and click the expand arrow to open it.
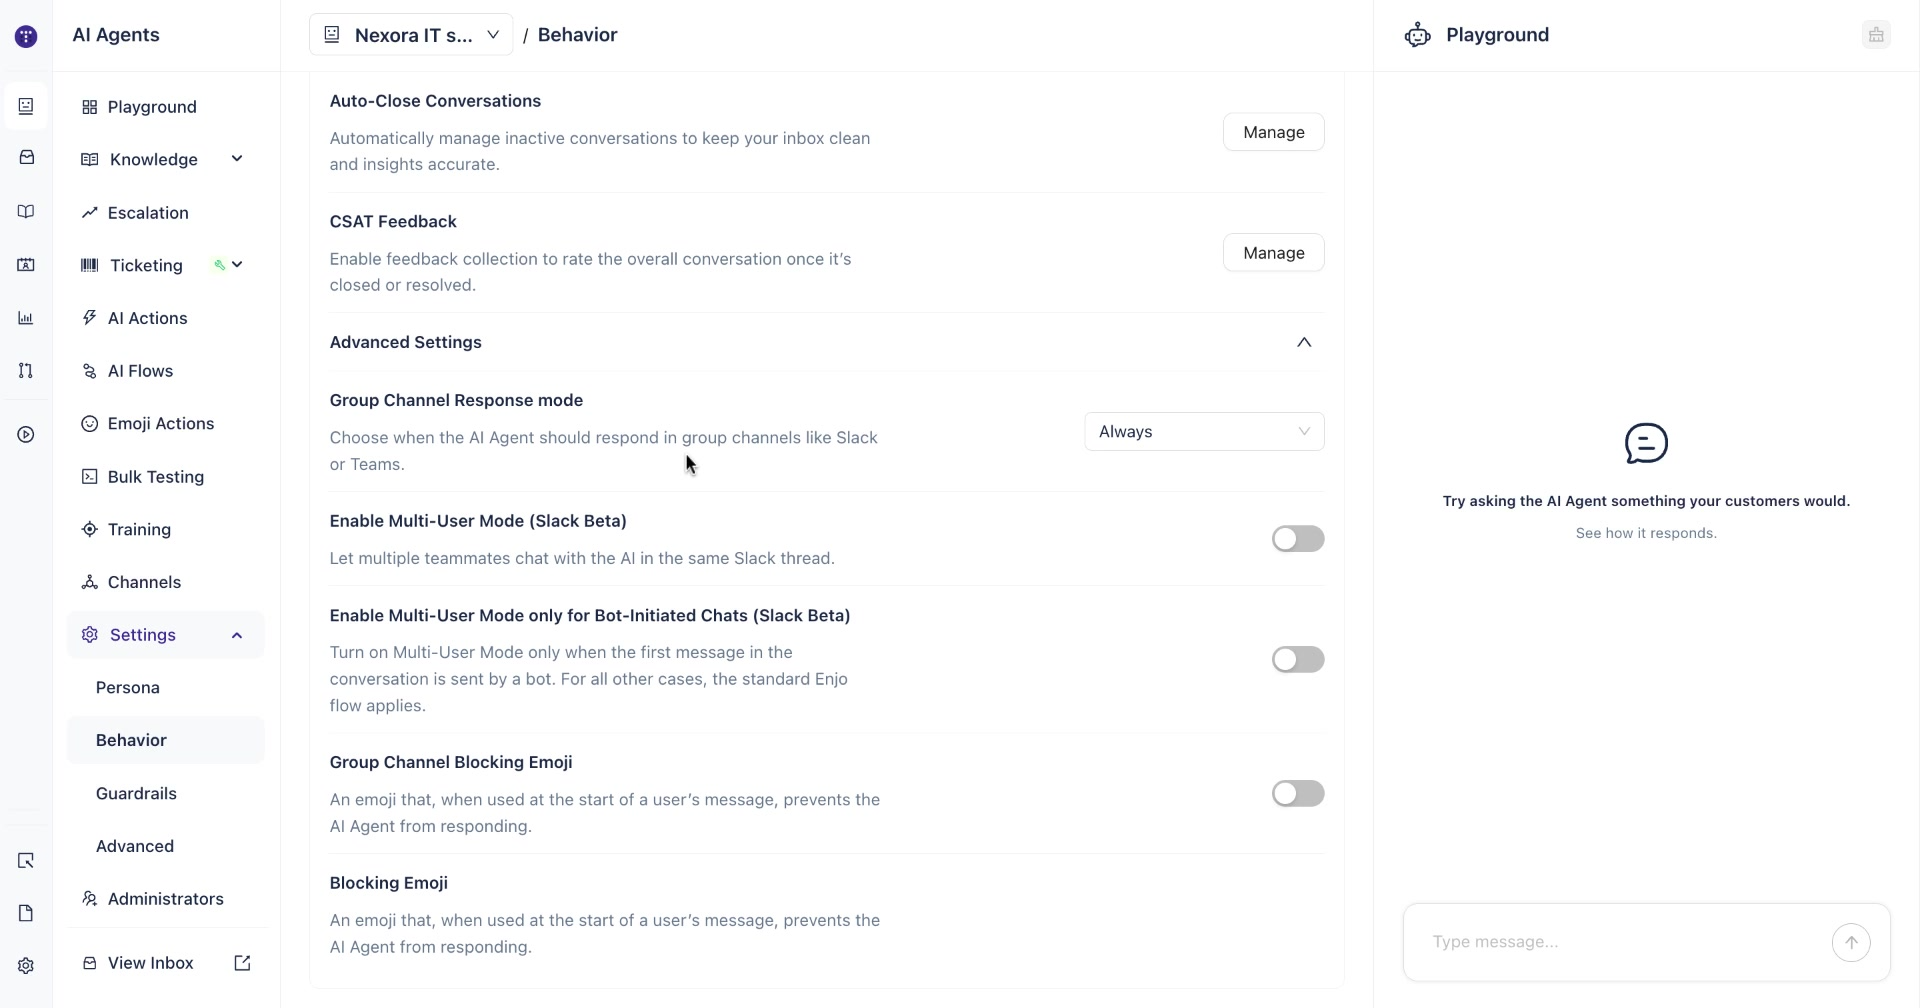
You'll see five settings here. We'll go through each one below.
Step 2: Set Group Channel Response Mode
Group Channel Response Mode determines when your AI agent responds to messages in a shared channel like a Slack support channel or a Microsoft Teams group.
Click the dropdown next to Group Channel Response Mode and choose one of the two options:
Always — The agent automatically responds to every message posted in the connected group channel.
Only When Mentioned (@-mentioned) — The agent stays silent unless a user explicitly tags it in a message.
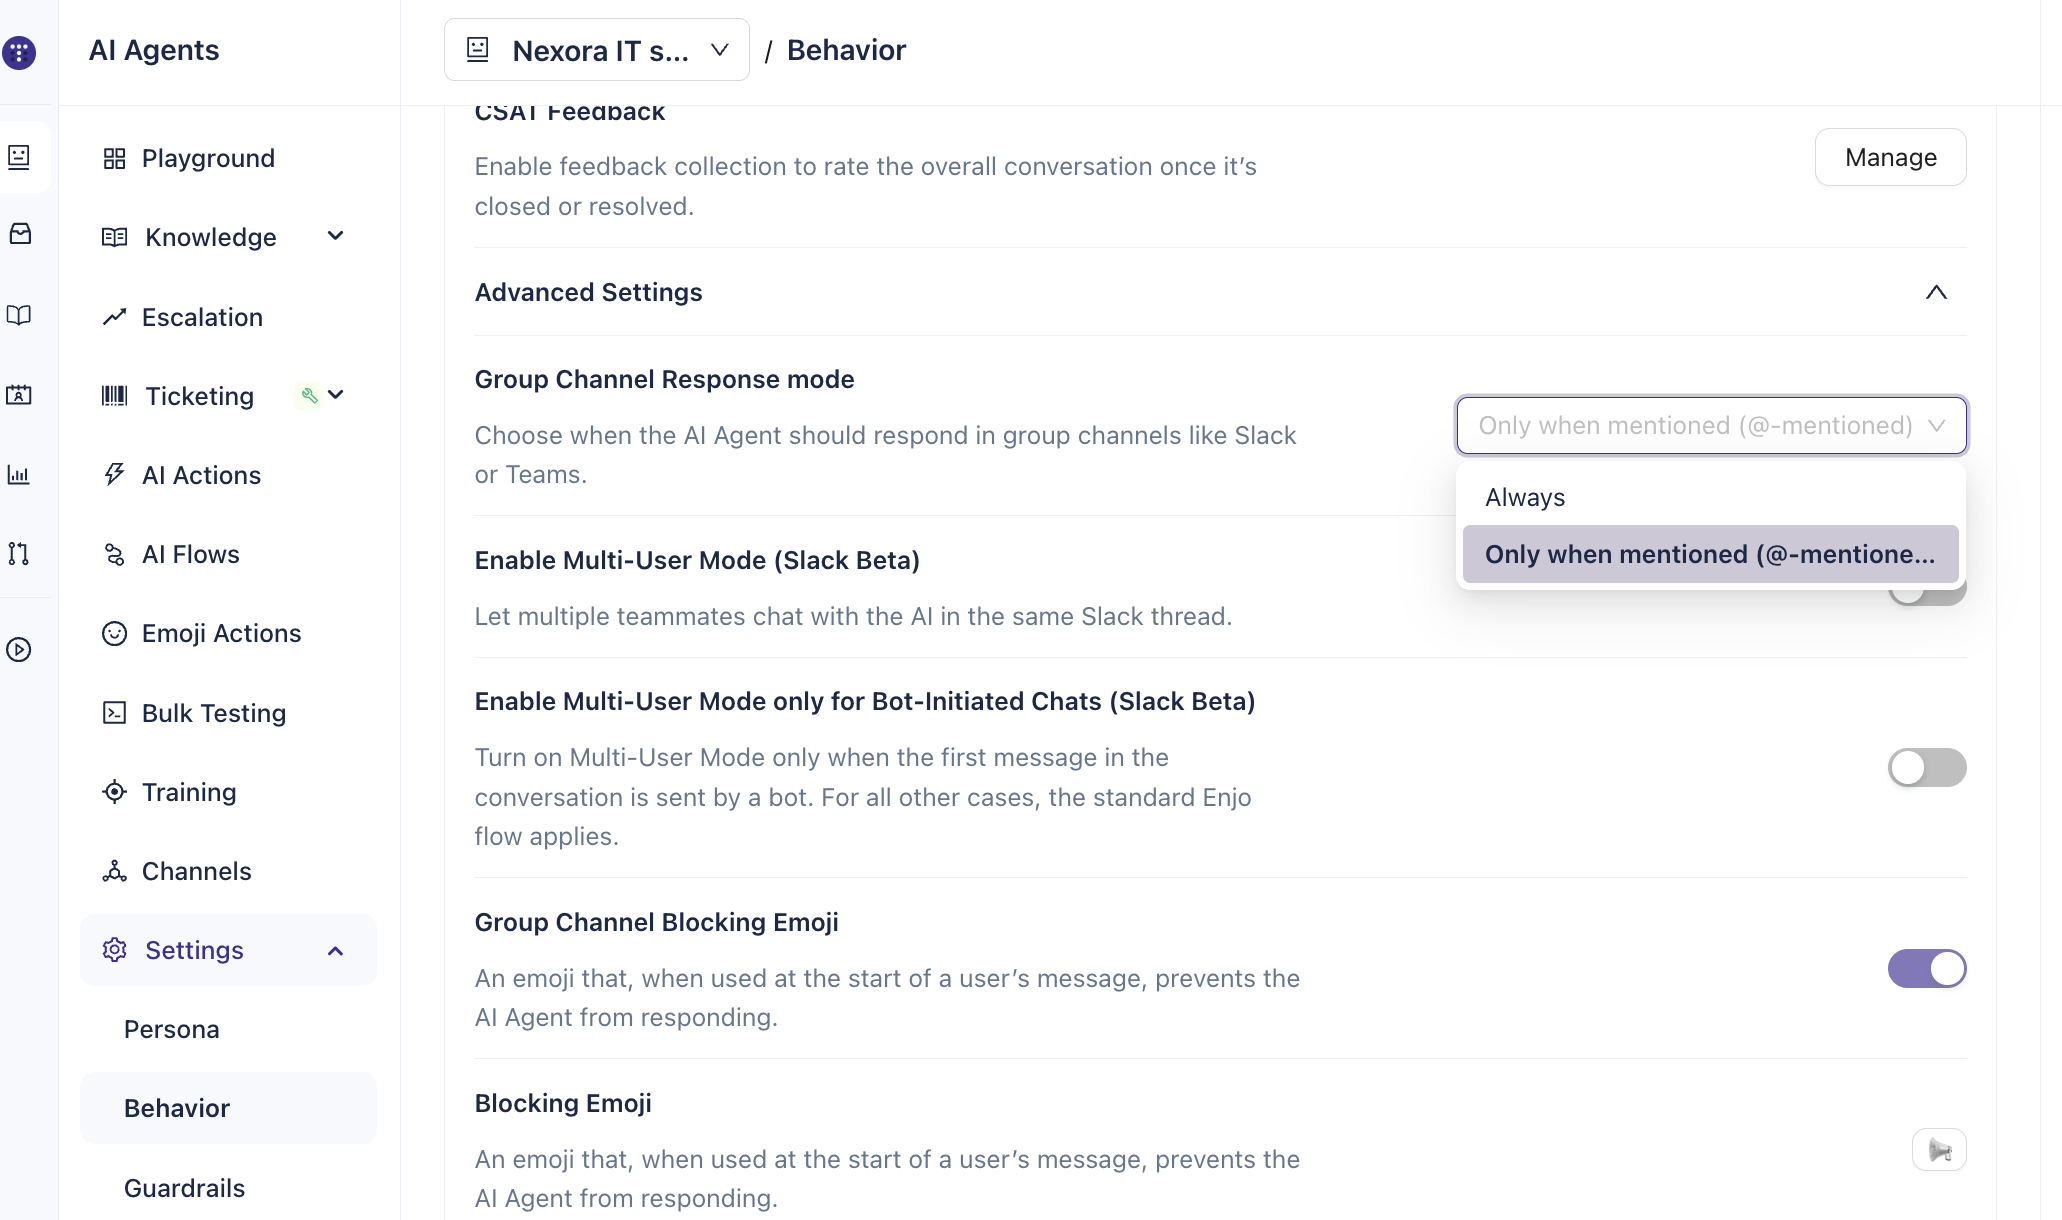
When to use each option:
Use Always in dedicated support channels where every message is intended for the AI agent. Use Only When Mentioned in general channels where the agent is one of many tools, and you don't want it responding to every conversation.
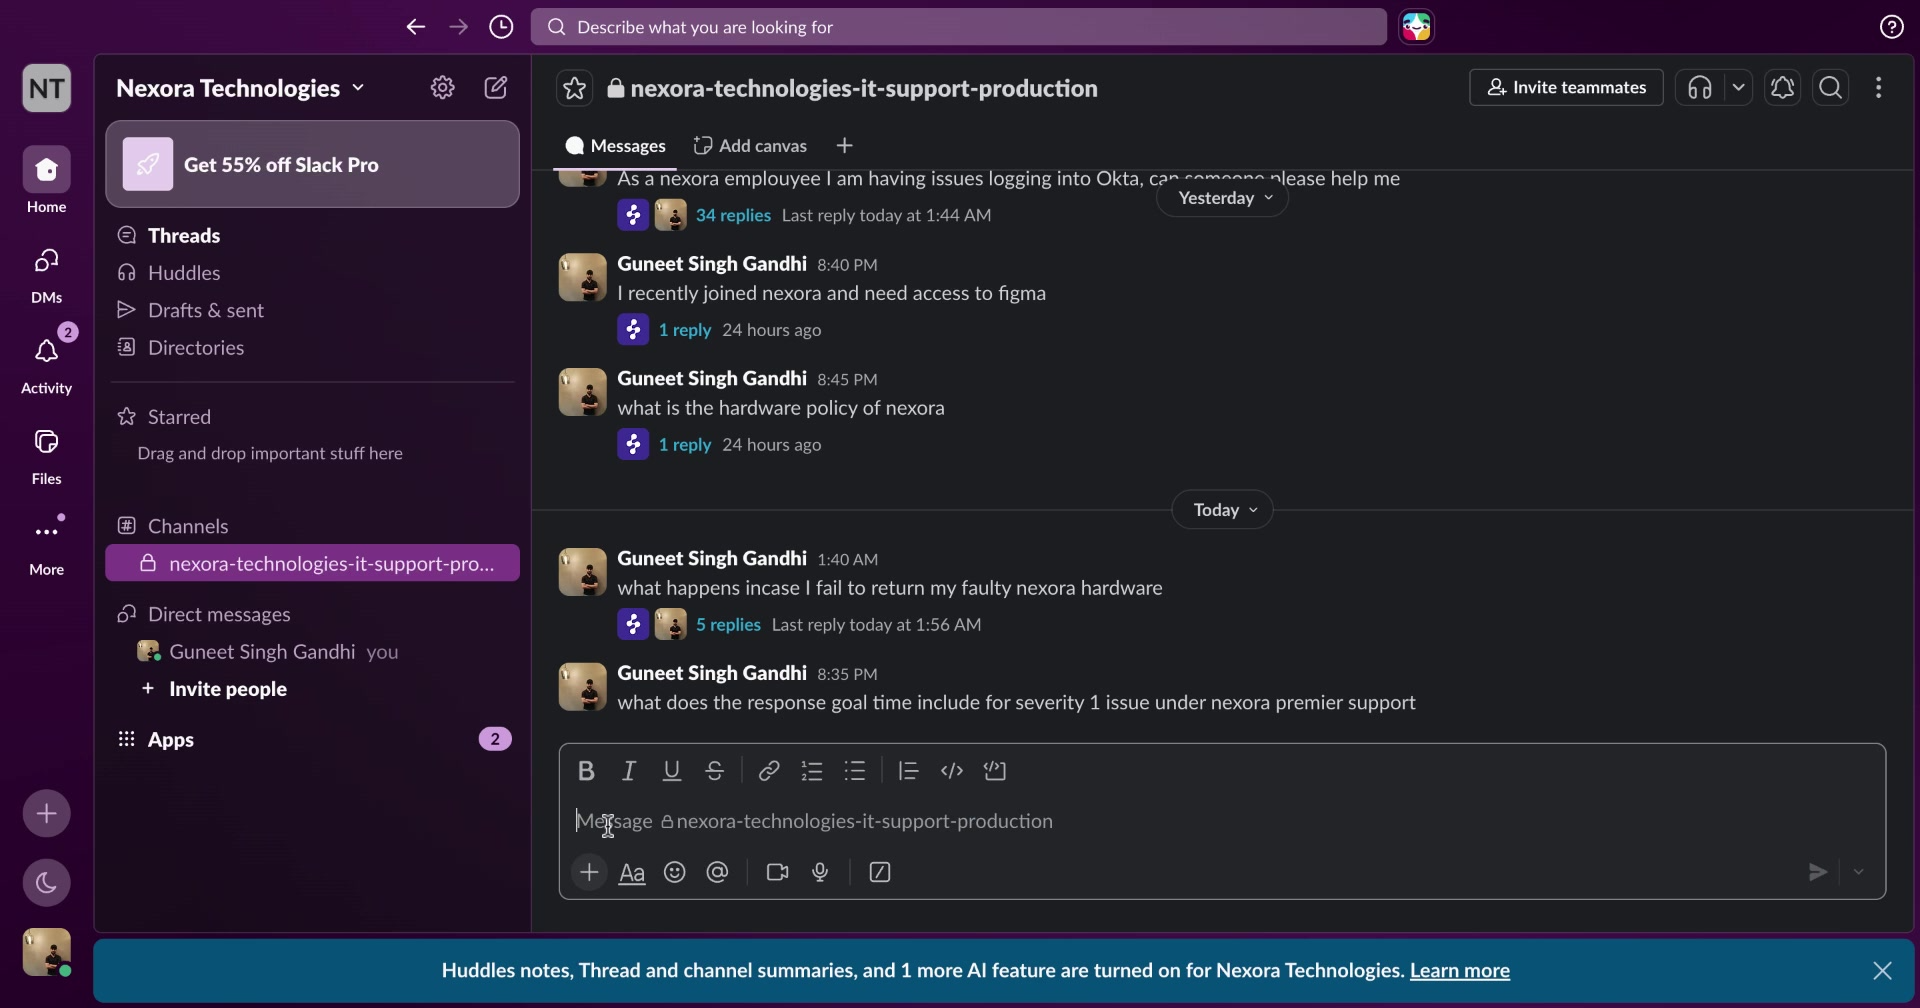
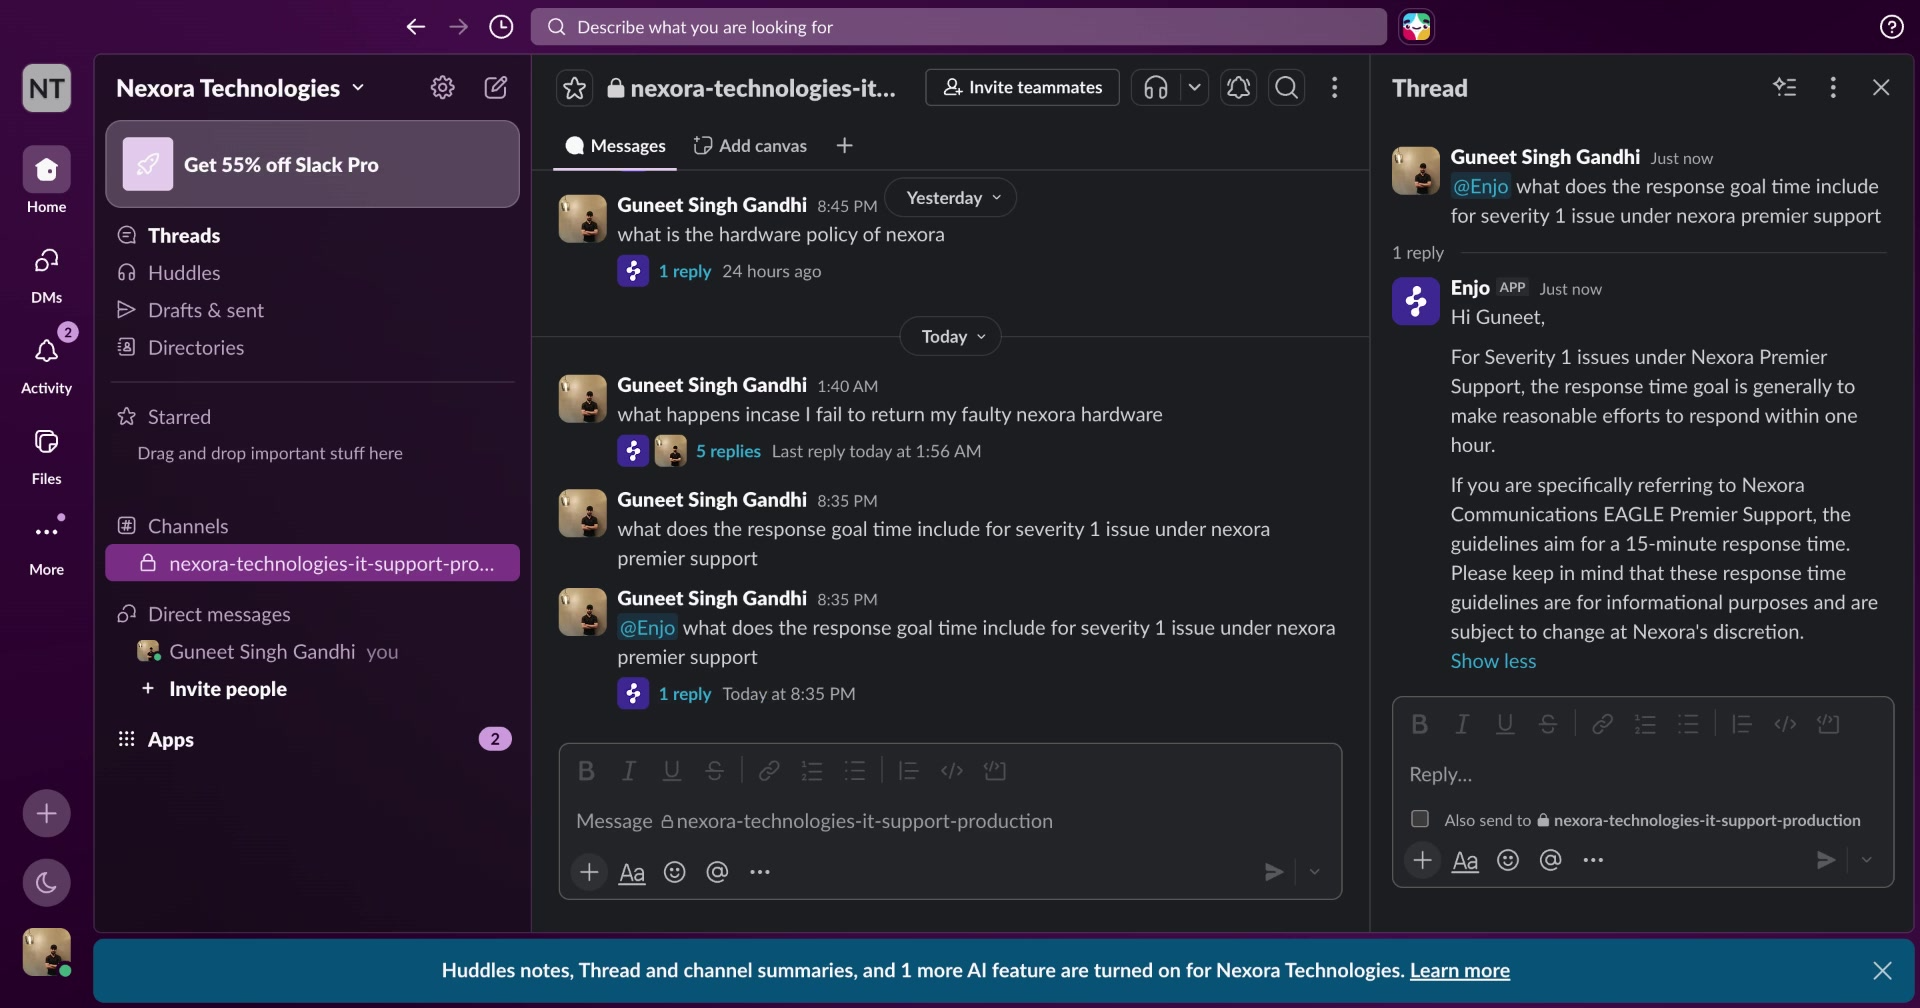
Here's how this looks in practice in Slack — with the mode set to "Only When Mentioned", the agent stays quiet until explicitly tagged:
Step 3: Configure Enable Multi-User Mode (Slack Beta)
By default, Enjo treats each Slack thread as a single-user conversation. If a second person joins the thread and replies, Enjo treats the conversation as escalated to a human agent and stops responding automatically.
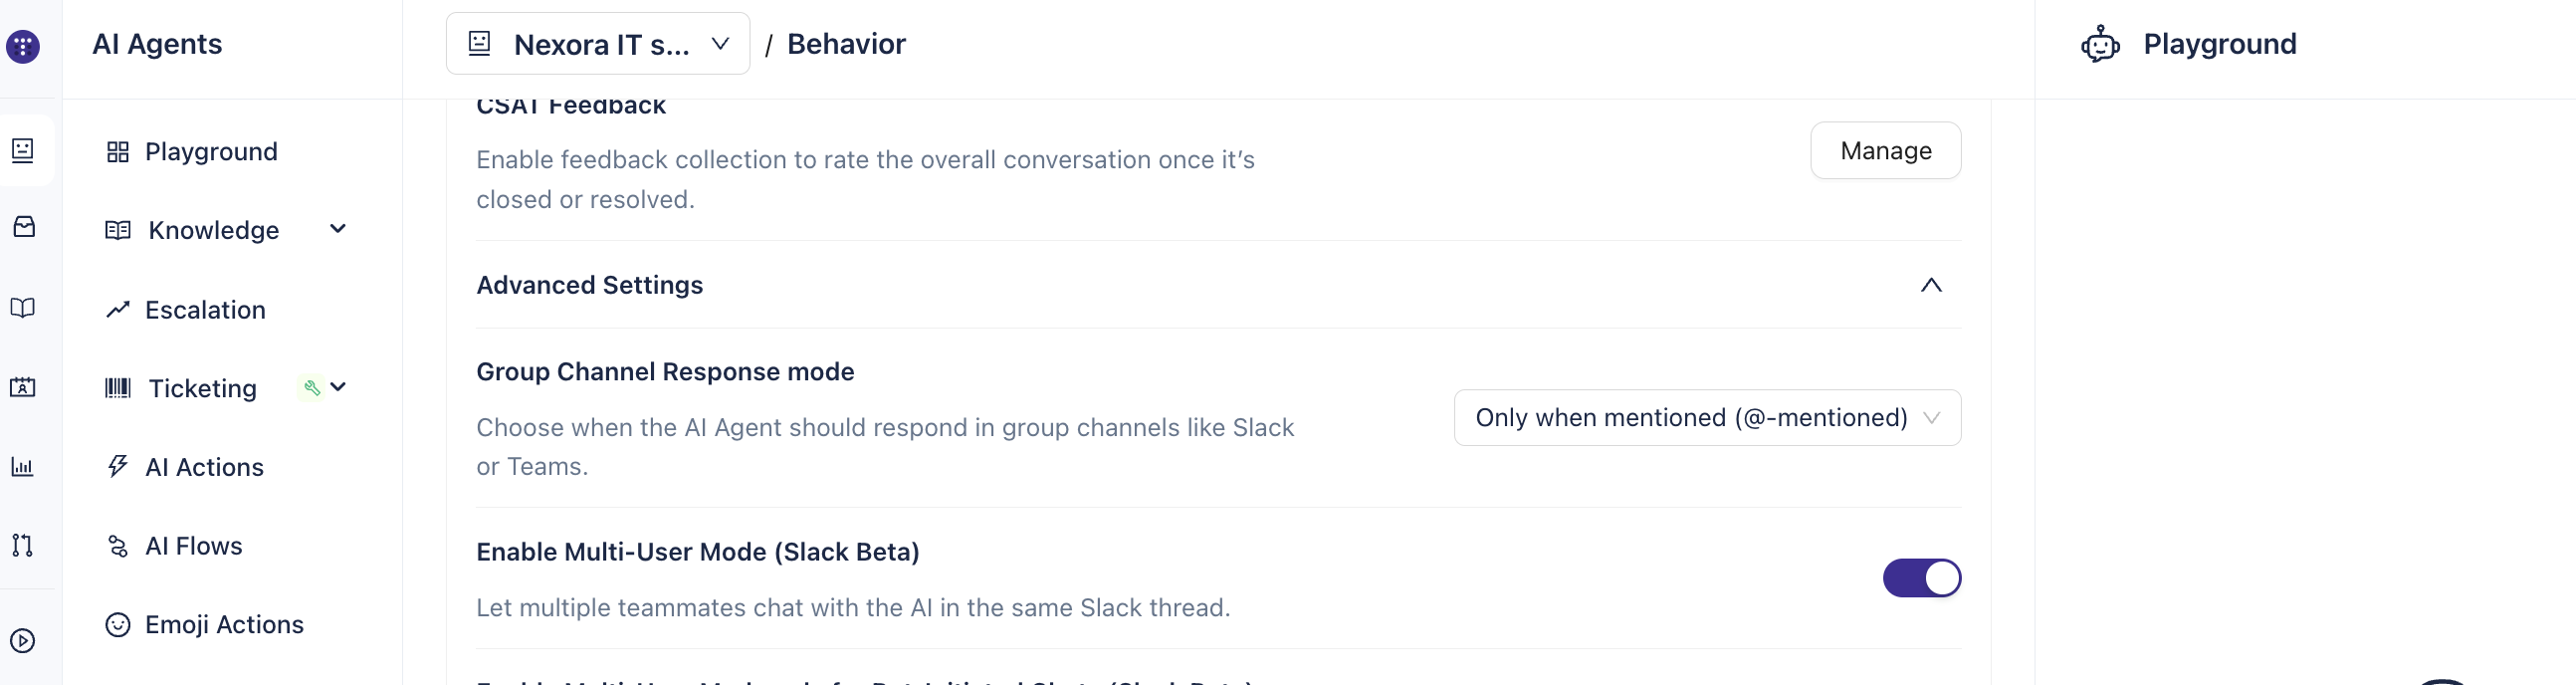
Enable Multi-User Mode changes this behavior. When turned on, multiple teammates can chat with the AI agent in the same Slack thread, and the agent will continue responding to all of them while maintaining conversation context.
To enable it, toggle the Enable Multi-User Mode (Slack Beta) switch to on.
Note: This is currently a Slack Beta feature. It is not yet available for Microsoft Teams channels.
Step 4: Configure Enable Multi-User Mode Only for Bot-Initiated Chats (Slack Beta)
This is a more targeted version of Multi-User Mode. When enabled, the multi-user behavior only applies to threads that were started by a bot — not by a human user.
So if a bot posts the first message in a thread and Enjo is participating in that conversation, Enjo will keep responding even if a human user joins later. The conversation won't be treated as escalated to a human agent.
For threads started by a human user, the standard single-user behavior still applies.
To enable it, toggle the Enable Multi-User Mode only for Bot-Initiated Chats (Slack Beta) switch to on.
Tip: This setting is useful in automated workflows where a bot kicks off a thread (for example, an incident alert or an onboarding flow) and you want Enjo to remain active even as team members join the discussion.
Step 5: Configure Group Channel Blocking Emoji
The Group Channel Blocking Emoji setting lets you designate a specific emoji that, when placed at the start of a message, tells Enjo to ignore that message entirely and not respond.
Important: This setting is only available when Group Channel Response Mode is set to Always. If your mode is set to "Only When Mentioned", this option will be grayed out.
To set it up:
Make sure Group Channel Response Mode is set to Always.
Toggle the Group Channel Blocking Emoji switch to on.
Click the emoji selector next to Blocking Emoji and choose the emoji you want to use as the block signal.
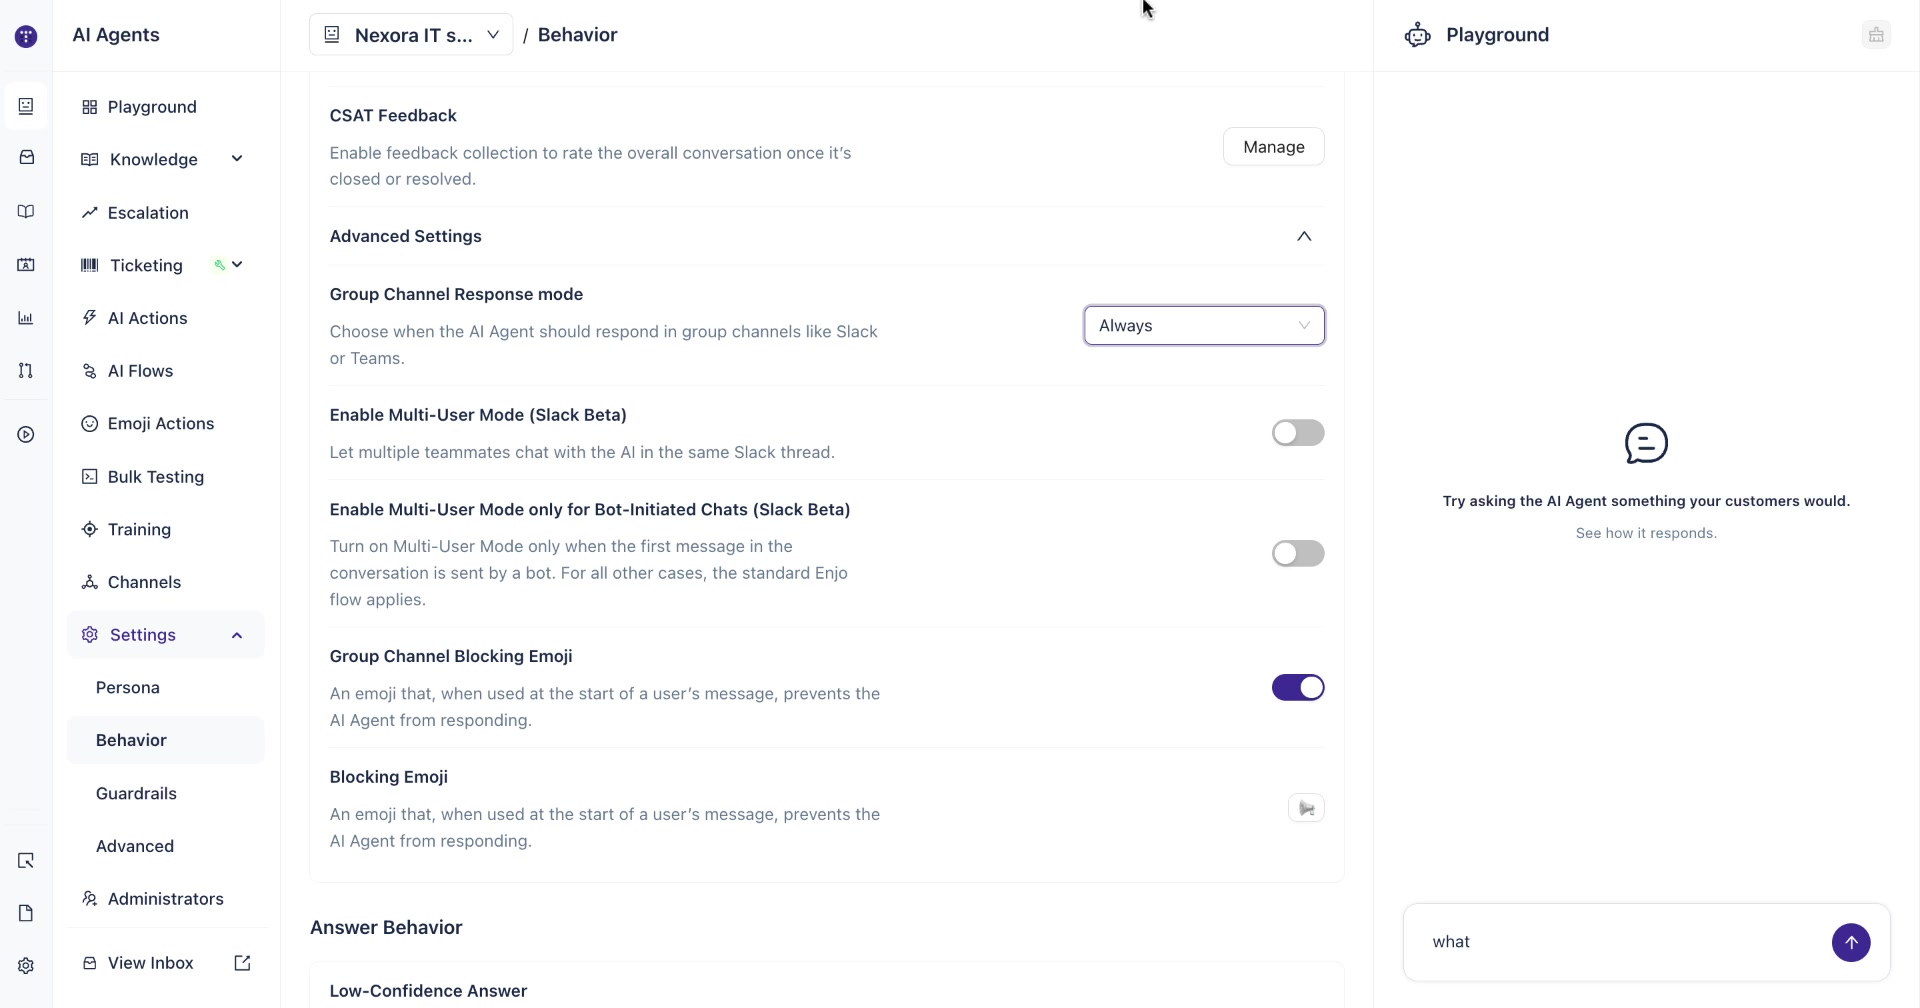
Once configured, any message that starts with that emoji will be ignored by the agent — even in a channel where the response mode is set to Always.
Here's how it works in Slack:
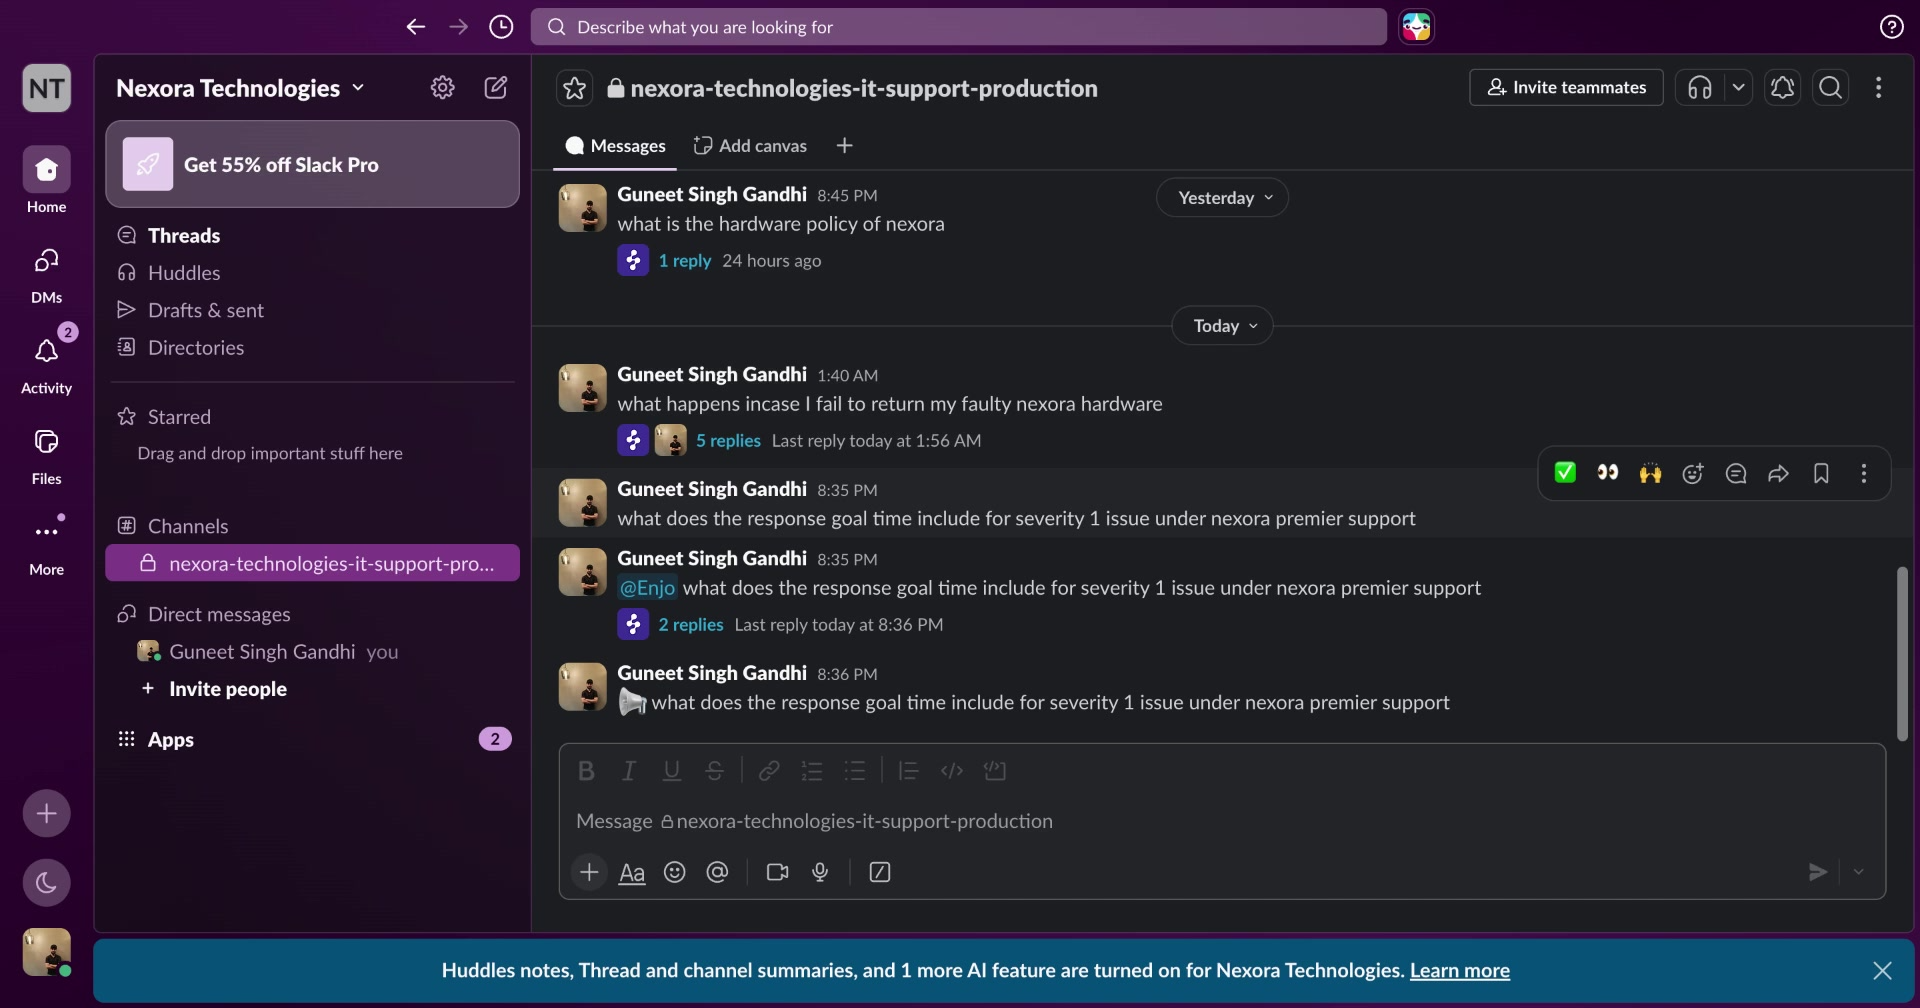
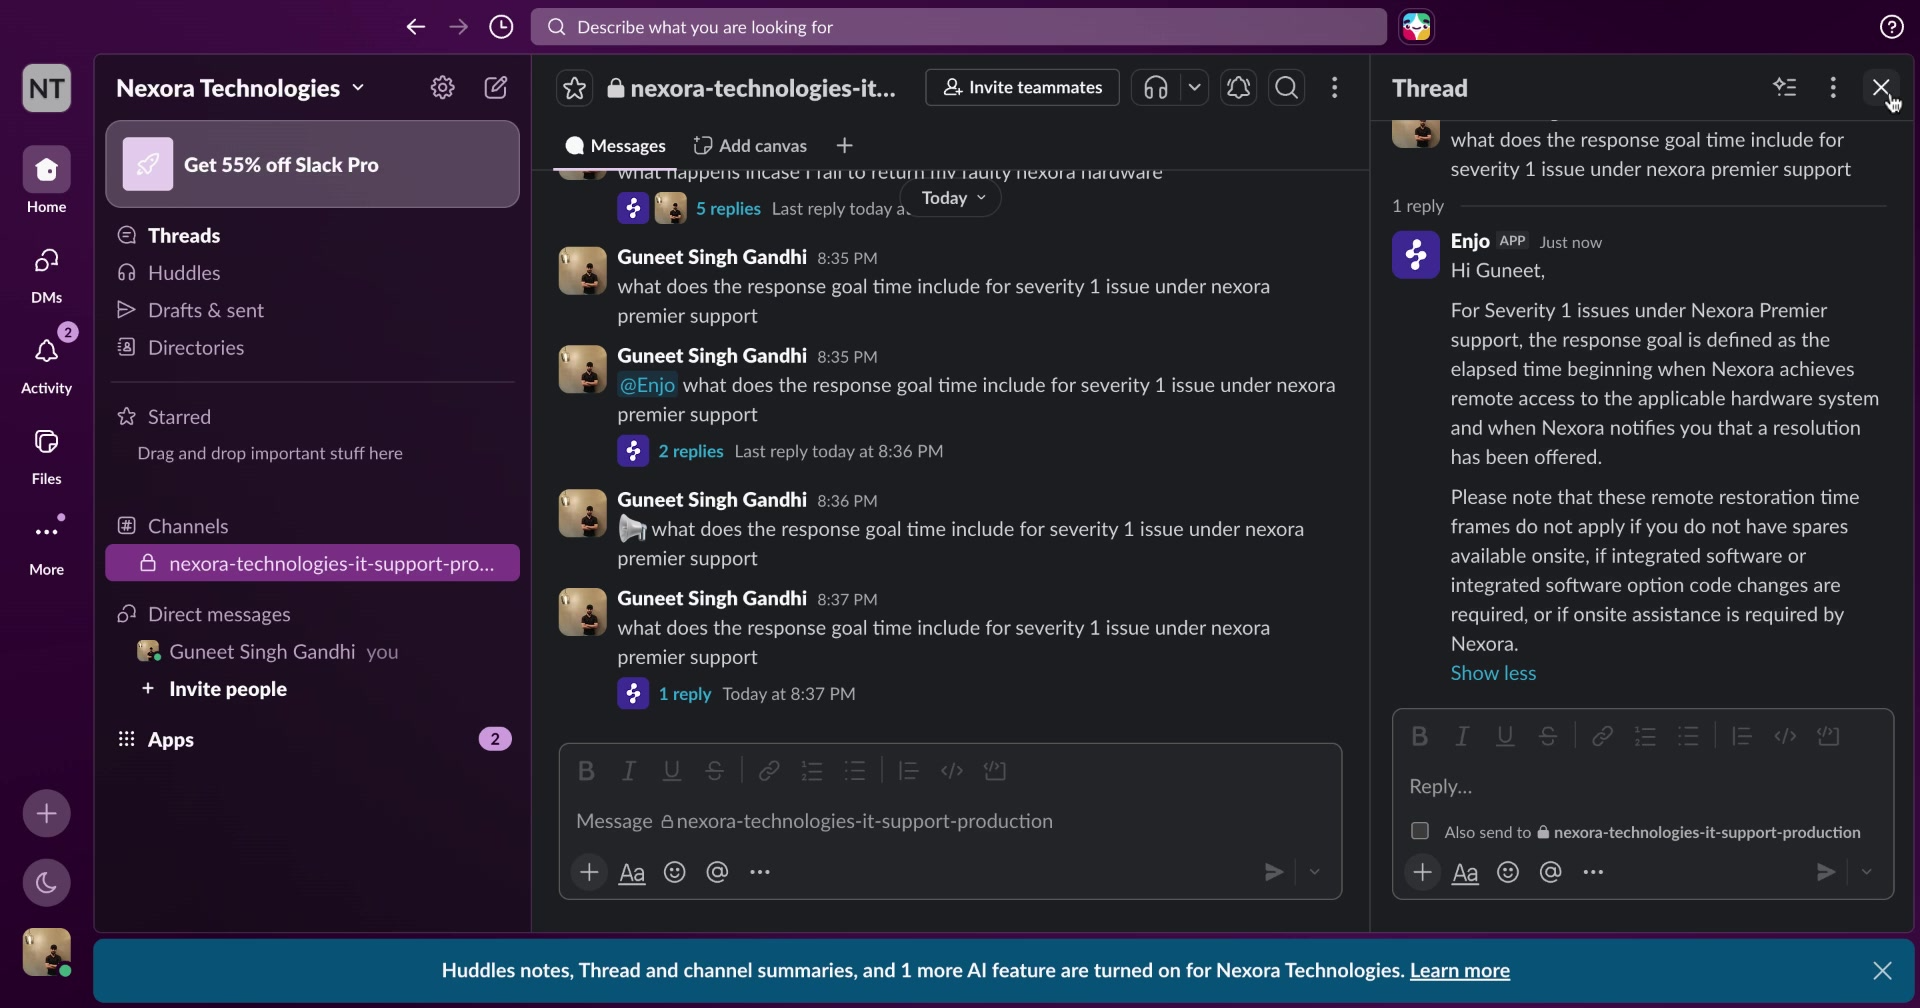
Tip: The blocking emoji is handy for internal team messages in a support channel. If someone on your team needs to post a note or an update that isn't meant for the AI agent, they can start the message with the blocking emoji and Enjo will skip it.
What's Next
Configuring AI Agent Answer Behavior Settings — Set up how your agent handles low-confidence answers, fallback messages, citations, and response feedback.
Guardrails — Define what your AI agent will and won't respond to, keeping it on-topic and safe for your users.