
Jira Cloud
Enable Enjo's AI Agent to create, update, and manage tickets in Jira Cloud. Use direct application links to establish a secure OAuth 2.0 connection that keeps both systems in sync.
What You Can Do
AI Agent Ticketing
AI Agent creates Jira tickets automatically from Slack requestsApproval Workflows
Route Jira approvals through Slack for instant decisionsReal-time Sync
Changes in Jira reflect in Enjo instantly; Slack updates sync back to JiraCustom Fields
Map Enjo request data to Jira custom fields automatically
What You Need
Jira Cloud instance (SaaS/cloud-based)
Enjo Owner or Admin role
Jira Admin access to your Jira Cloud workspace
Slack workspace connected to Enjo
OAuth 2.0 support (built into Jira Cloud)
⚠️ Note: If you use Jira Server or Data Center (self-hosted), see Connect Jira Server/Data Center instead.
Two Ways to Start
You can initiate the connection from two places:
Option 1: From AI Agent Ticketing Settings
Go to AI Agents > [Your Agent] > Ticketing and click Configure Jira
Option 2: From Global App Settings
Go to Settings > Apps > Connect Apps > Jira > Add New > Jira Cloud
Both paths lead to the same setup flow.
Part 1: Enter Connection Details
Configure your Jira Cloud workspace.
Step 1: Enter Connection Name
In Connection Name, enter a label for this integration.
Examples:
Production Jira
Engineering Jira Cloud
ITSM Jira
ℹ️ Use a name that identifies which Jira workspace this connects to.
Step 2: Click Add New
Click Add New
Step 3: Select Jira Cloud
In the dropdown, select Jira Cloud (not Jira Server or Data Center)
Step 4: Enter Jira Domain
In Jira URL, enter your Jira Cloud domain.
Example:
https://company.atlassian.net✅ Include https:// and the .atlassian.net domain
Step 5: Continue
Click Next
Part 2: Configure OAuth Link in Jira
Create a direct application link to authorize Enjo.
Step 1: Follow Setup Instructions
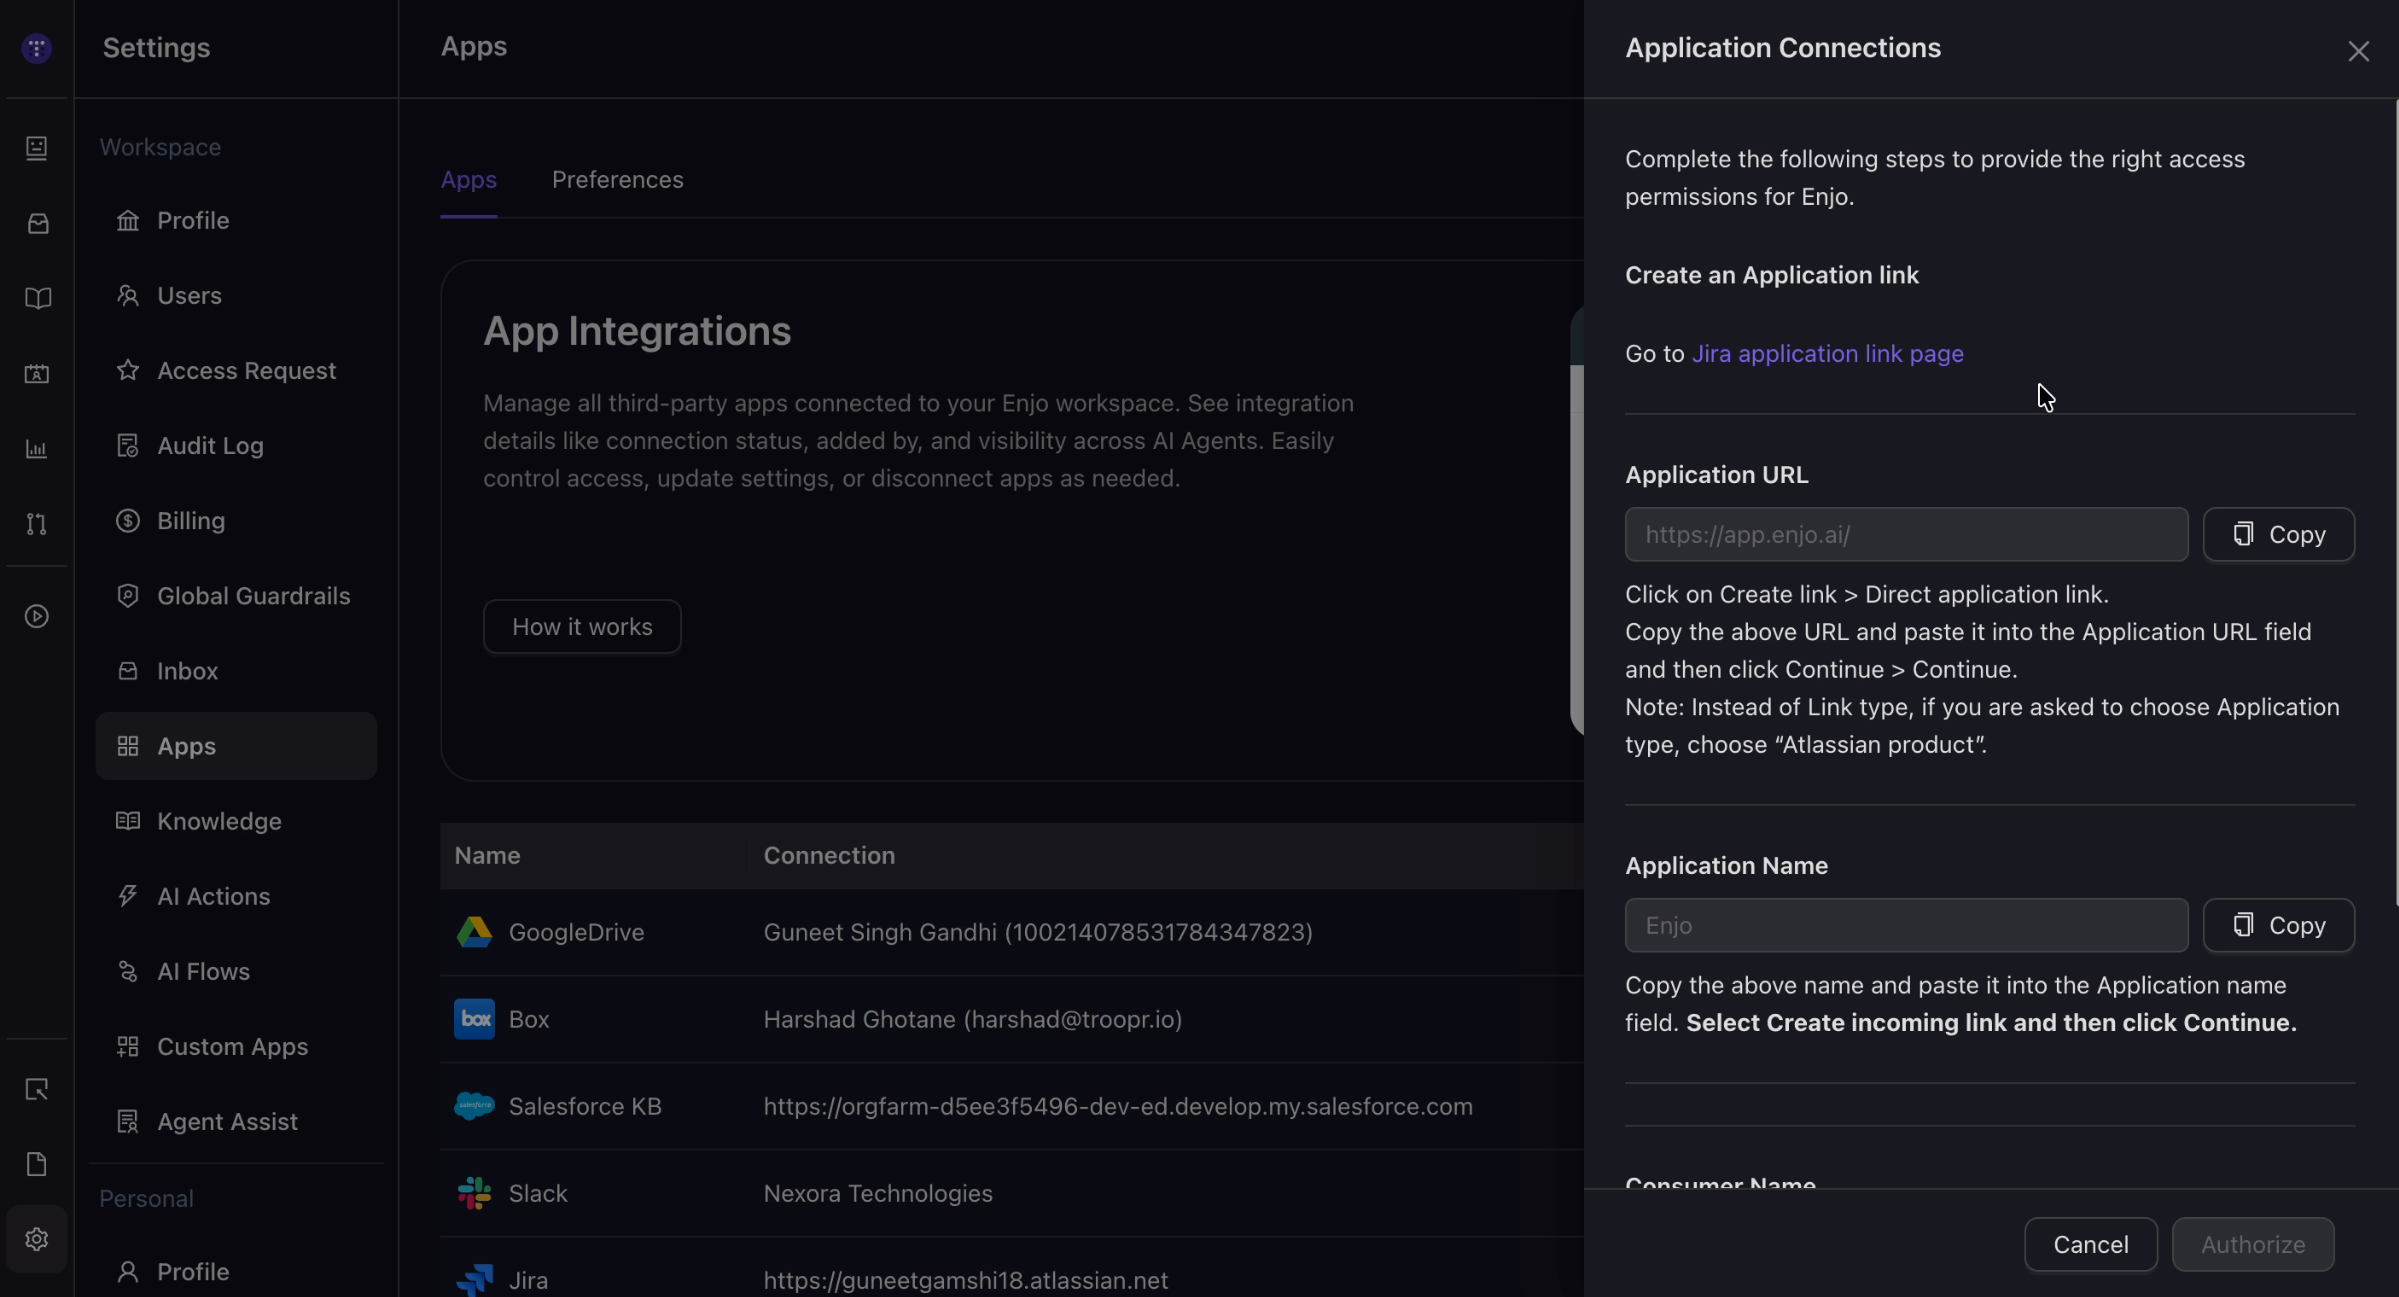
On the next screen, you'll see setup steps.
Under Create an Application link, click the provided link.
This opens your Jira Cloud Administration page.
Step 2: Create Direct Application Link
In Jira Cloud:
Go to Apps > App integrations
Scroll to Application links
Click Create link
Step 3: Select Direct Application Link
Choose Direct application link (not generic application)
Step 4: Enter Application URL
In Application URL, paste the URL provided in Enjo:
https://app.enjo.aiClick Continue
Step 5: Fill Application Metadata
Application Name: Enter Enjo
Application Type: Select Generic Application
Click Continue
Step 6: Enable Incoming Link
Check: Create incoming link
Click Continue
Part 3: Copy Keys and Complete Setup
Exchange authentication keys between Enjo and Jira.
Step 1: Note the Details from Jira
Jira displays:
Application URL: https://app.enjo.ai
Name: Jira
Application: JIRA
Leave these as-is. These are Jira's settings for Enjo.
Click Continue
Step 2: Copy Details from Enjo
Switch back to Enjo. You'll see three fields:
Application URL — (already pre-filled)
Application Name — Click Copy
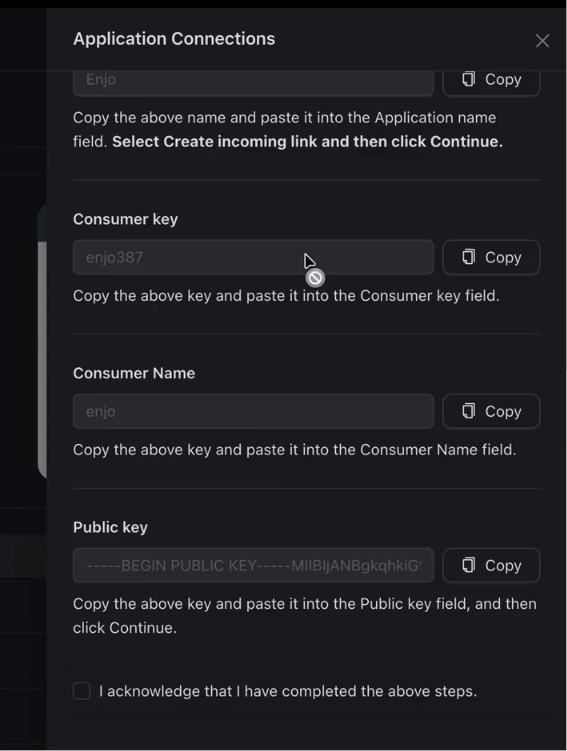
Consumer Key — Click Copy
Step 3: Paste into Jira
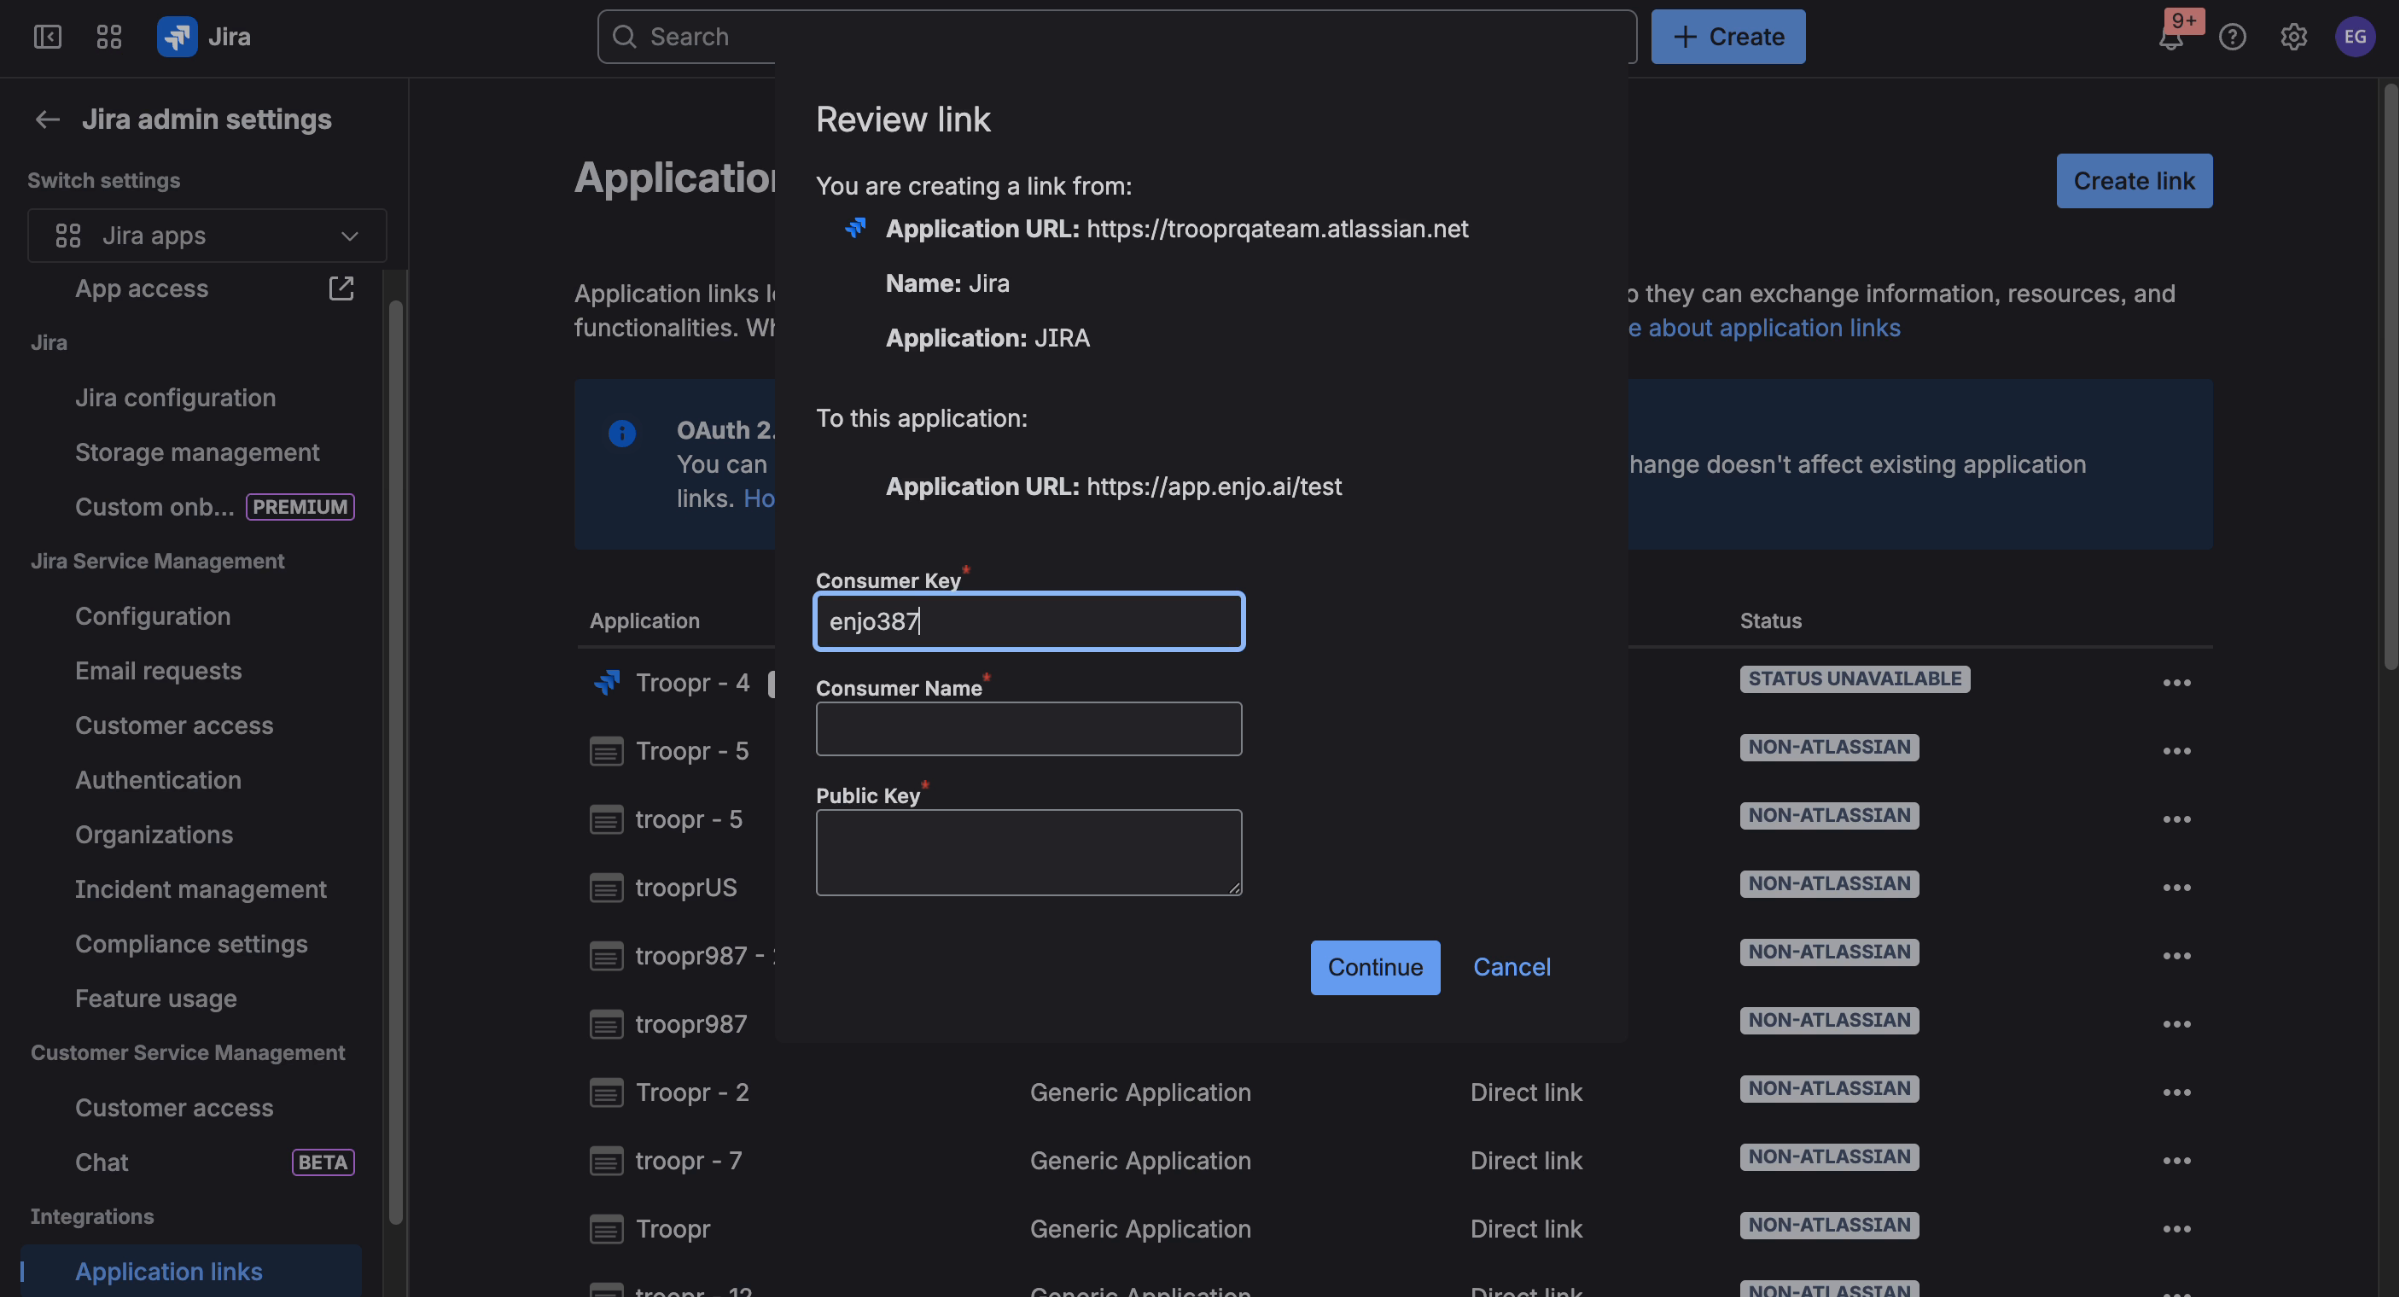
In Jira's OAuth form, fill:
Application Name — Paste the name from Enjo
Consumer Key — Paste the key from Enjo
Step 4: Copy Public Key
In Enjo, find Public Key and click Copy
In Jira, paste into Public Key field.
Step 5: Acknowledge and Continue
In Jira, click Continue
Jira generates OAuth tokens.
Part 4: Finalize Authorization
Complete the connection handshake.
Step 1: Wait for Processing
Return to Enjo,You'll see a processing message.
Wait for it to complete.
✅ You'll see: Jira has been setup successfully
Step 2: Review Setup Confirmation
Read the summary:
Connection name ✅
Jira Cloud domain ✅
OAuth status ✅
Step 3: Acknowledge Completion
Check the box:
I acknowledge that I have completed all the above steps
Step 4: Authorize Connection
Click Authorize
Enjo tests the OAuth connection with Jira Cloud.
Step 5: Verify Success
You'll see a success confirmation.
Your Jira Cloud instance appears in your connected apps list with status Active.
Using Jira Cloud with AI Agent Ticketing
Your AI Agent can now create tickets in Jira Cloud.
Enable Ticketing in Your AI Agent
Go to AI Agents > [Your Agent]
Click Ticketing
Select Jira Cloud from the dropdown
Choose a Project and Issue Type
Map Custom Fields if needed
Save
Test the Connection
Ask your AI Agent to create a test ticket in Slack.
The ticket appears in your Jira Cloud project automatically.
Managing Your Connection
View Connected Jira Instance
Go to Settings > Apps
Your Jira Cloud instance is listed with:
Connection name
Domain (e.g., company.atlassian.net)
Status (Active/Inactive)
Created date
Edit Connection
Click ••• next to your Jira instance and select Edit
You can update:
Connection name
Project assignments
Field mappings
Disconnect Jira
Click ••• and select Disconnect
⚠️ This removes the OAuth link but does not delete tickets in Jira.
Connect a Second Jira Cloud Workspace
Repeat the setup process and give it a different connection name (e.g., "Jira - Staging").
Troubleshooting
"Invalid Jira Domain" Error
Check:
Domain is correct (company.atlassian.net)
No extra slashes or spaces
Jira Cloud is active and accessible
"OAuth Authorization Failed"
Causes:
Insufficient permissions in Jira
OAuth token expired
Fix:
Ensure you have Jira Admin access
Delete the application link in Jira
Restart the connection process in Enjo
"Application Link Already Exists"
Solution:
Go to Jira > Apps > App integrations > Application links
Delete any existing "Enjo" links
Start fresh connection in Enjo
Tickets Not Creating
Check:
AI Agent ticketing is enabled
Correct Jira project is selected
Issue Type is valid in that project
AI Agent has a knowledge source configured
Jira Cloud Permissions Required
Your Jira admin account needs these permissions:
✅ View projects
✅ Create issues
✅ Edit issues
✅ Manage application links (admin-only)
Ask your Jira Cloud admin to verify your permissions if you see access errors.
What's Next?
Connect Jira Server/Data Center — For self-hosted Jira
AI Agent Ticketing — Enable ticket creation in your agent
Jira Approval Workflows — Route approvals to Slack
Emoji Actions — Create tickets from Slack
Integrations Hub — All available integrations