
Fallback Jira Account
In this article, you'll learn how to set up a fallback Jira account so Enjo can create and update tickets for people who haven't signed in to Jira, and how to control who can use it. This setting was previously called Guest Facilitation.
How it works
When someone raises a ticket, Enjo uses their own Jira account if they've signed in to Jira. If they haven't, Enjo creates and updates the ticket as the fallback Jira account, including comments added from the conversation.
You can limit who may use the fallback account, separately for people and for AI agents.
Before you start
Jira must be connected to Enjo. See Jira Cloud or Jira DC.
Pick a Jira account that can see every service project. Enjo acts as this account for anyone who hasn't signed in.
Step 1: Open the Ticket creation settings
Go to Settings > Apps.
On the Jira row, open the ⋮ menu and select Open.
Select the Ticket creation tab.
💡 Workspaces that still use the classic Jira screens show this setting on a Guest Facilitation tab instead.
Step 2: Set the fallback account
Under Fallback Jira account, select Set fallback account.
Sign in to Jira with the account you want Enjo to use.
Back in Enjo, the account name and email appear under Fallback Jira account. Select Details to see the account, who set it, and when.
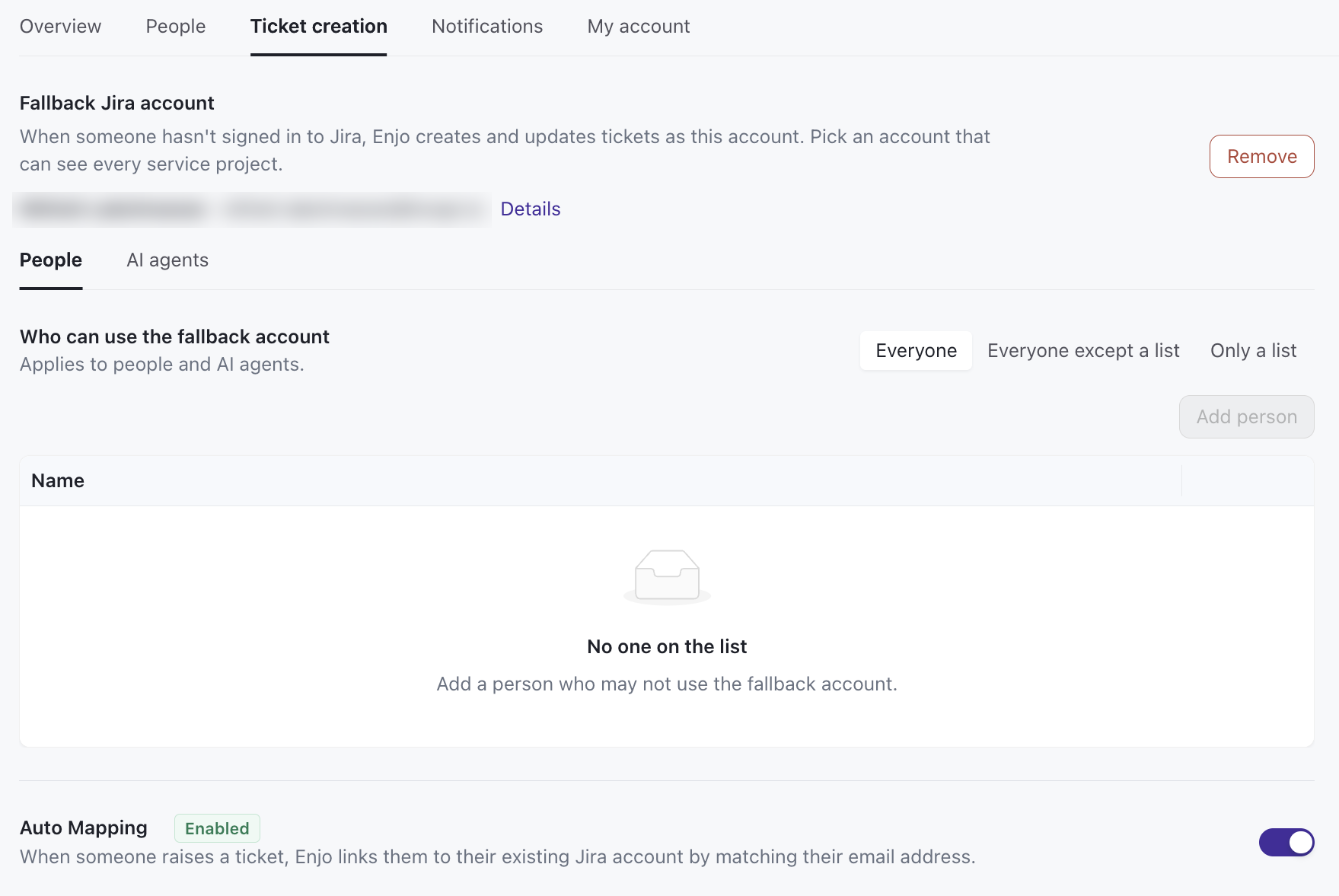
💡 To use a different account, select Remove, then set the fallback account again. While no fallback account is set, people who haven't signed in to Jira can't create tickets until they sign in.
Step 3: Choose who can use the fallback account
Select the People tab to set this for people, or the AI agents tab to set it for AI agents.
Under Who can use the fallback account, choose an option:
Everyone — anyone who hasn't signed in to Jira can use it.
Everyone except a list — add the people or AI agents who may not use it.
Only a list — add the only people or AI agents who may use it.
For a list option, select Add person (or Add AI agent) and add them.
⚠️ Switching between list options empties the current list. Enjo asks you to confirm before it does.
Step 4: Review Auto Mapping and Auto Customer Creation
Two more settings on the Ticket creation tab decide whose name a ticket is reported under:
Auto Mapping — when someone raises a ticket, Enjo links them to their existing Jira account by matching their email address.
Auto Customer Creation — when someone raises a ticket and has no Jira account, Enjo creates them as a Jira Service Management customer so the ticket is reported under their name. Turn it off to stop Enjo creating accounts in your Jira; tickets are still created, reported under the account that raised them. This setting uses the fallback account, so it can only be turned on once one is set.
What's next
Request Handling — Configure how your AI Agent handles the tickets it creates.
Jira Cloud — Connect Jira Cloud to Enjo.
Jira DC — Connect Jira Data Center to Enjo.